Are you struggling to find something to do with your food scraps besides tossing them in your smelly compost pile?
Try a worm bin!
Unlike standard composting systems, worm bins are odorless and contained, and the worms will help transform your waste material into stellar soil just as fast as you can feed them.
Intentionally bringing worms into your home (even kitchen!) might seem counterintuitive, but it’s one of the smartest ways to make your daily life more sustainable.
The process isn’t complicated, so keep reading to begin your adventure into the world of vermiculture today.
What is a Vermiculture?
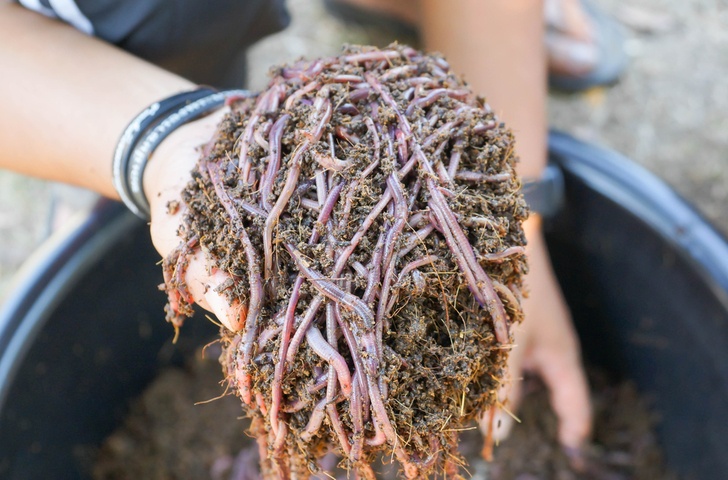
Vermiculture, also known as vermicomposting or worm composting, is the process of using worms to break down waste materials into compost.
No coaxing is needed to convince the worms to help out; they will happily munch through your food scraps, shredded paper, and other organic material, turning it into nutrient-filled ‘worm castings’ (poop) in the process.
Why Worms?
It’s no coincidence that worms are the creature of choice for making homemade compost.
Worms are a critical component of the soil construction process, and they are integral for breaking down organic waste, increasing soil porosity, and helping plant roots gain access to oxygen.
Traveling through a worm’s body is a magical process for building soil, as the castings they expel contain copious amounts of enzymes and beneficial microbes that improve the functioning of the soil web and help plants grow more vigorously.
They also are five times more abundant in nitrogen, ten times richer in potassium, and contain seven times as much phosphate, 1.5 times as much calcium, and three times as much magnesium as the material they are made from.
A standard worm system can house thousands of worms, most of which will live for a year or more, eating close to half their body weight each day. Dead worms also pose no issue, as they will shrivel up within the system and become part of the compost.
Worms are hermaphrodites, which means that each individual is both male and female. This makes reproduction a simple process. So long as you keep conditions optimal within the bin, your worm population should be self-sustaining and will increase to meet the bin’s capacity within months.
But why go through the effort of using a worm bin to make compost when you can create it in dozens of different ways? The benefits of worm compost might be enough to convince you.
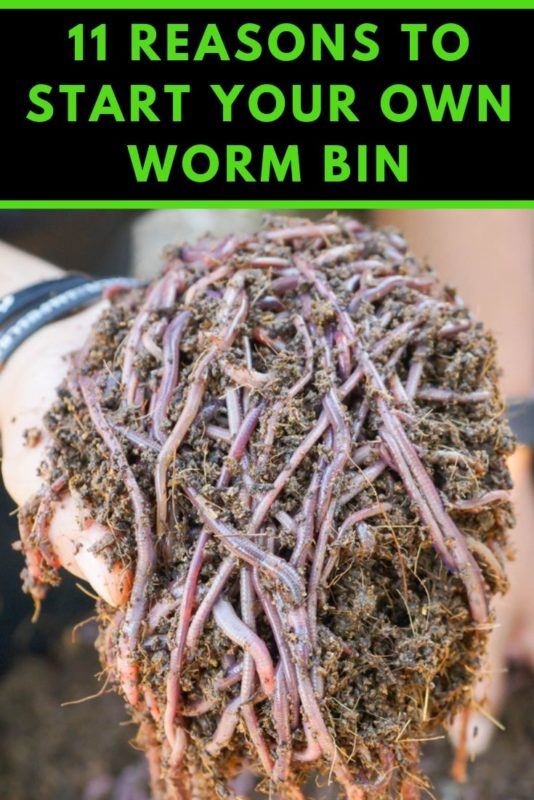
11 Benefits of Worm Compost
There’s a lot to like about cultivating your own worm compost supply. Below are some of the most significant benefits.
1. Reduce Food Waste
The United States has a food problem- we waste too much of it. The USDA estimates that roughly 30-40 percent of the entire food supply is thrown out, and the EPA suggests that close to 20% of the country’s total waste stream is composed of food scraps. You can stop the flow of food from your home into landfills by feeding it to worms instead.
2. Lower Greenhouse Gas Production
Letting food rot in a landfill produces methane, a greenhouse gas that’s 21 times more potent than carbon dioxide. In fact, dumps are the second largest producer of methane globally. Keeping your dinner scraps out of the trash will reduce its production.
3. Creates 100% Organic Fertilizer
If you worry about the origins of what you put in your garden, homemade worm compost cuts out the confusion by giving you total control over what goes in the worm bin – and what eventually goes into your soil.
4. Lower Trash Disposal Expenses
Many municipalities make you pay for trash disposal by weight, and food scraps will add heft to your bags fast. If you can divert your organic waste into a compost system instead, you’ll reduce your home’s trash production by roughly a third, which translates to money off your monthly bills.
5. Improve Plant Resilience
Your garden plants need more than basic nutrients to grow, and worm casting can produce rich, nutritious planting soil. They also contain copious amounts of microorganisms that can improve a plant’s resistance to pests and disease. Also, worm compost is 100% organic, meaning that by using it you won’t be putting your family and the environment at risk by using chemical fertilizers.
6. Pest-free Compost Production
Many would-be compost enthusiasts avoid starting the process for fear that an outdoor pile of food scraps will draw every pest in the neighborhood in for a free meal (and they’re not wrong). In contrast, a worm bin creates a contained composting system that you can keep indoors, which prevents the local raccoon population from working through your pile.
7. Reduces Trash Odors
It might be counterintuitive, but an indoor worm composting system can smell BETTER than standard kitchen trash. This is because the airless conditions in most trash bags cause anaerobic decomposition, which leads to putrid odors. In contrast, allowing oxygen into the bin reduces these odors and breaks down food scraps faster.
8. Increases Soil Water Retention
Sandy soil gardeners know how hard it is to keep their plants hydrated. Infusing the soil with regular doses of worm compost will make a difference by improving the soil texture, improving aeration, and helping plant roots anchor better in the earth.
9. Improves Soil Nutrient Levels
Worm castings are concentrated packages of nutrients, making them ideal for topdressing your garden soil in the middle of the season. And, unlike standard compost, worm casting also contain the worm’s gut bacteria and mucus, substances that make nutrients and minerals easier for plants to absorb.
10. Speedy Compost Production
Healthy red wigglers can eat half their body weight in food scraps each day, providing you with some of the fastest compost production possible.
11. Gentle on Plants
Despite their impressive nutrient levels, worm castings won’t burn young plants and are safe to apply at any quantity.
How to Get Started With Vermicomposting
Ready to add the wonders of worm compost to your strategy for greater sustainability? It’s not as difficult as you think. Just follow these steps to get started.
1. Pick the Right Worm Bin
You don’t need an enormous garden to take advantage of worm composting – or even a backyard. In fact, you can quickly create a supply of worm castings indoors year-round through a worm bin.
As the name implies, a worm bin is a container designed to house worm species well-suited for making compost, like red wigglers.
Commercially available worm bins typically consist of layer bins with holes between them so that worms can travel from one level to another and produce castings along the way.
If you’re feeling handy, it’s also possible to make your own worm bin, as these instructions show from Mother Earth News.
No matter what kind of bin you choose, there are specific components that it should include for best success.
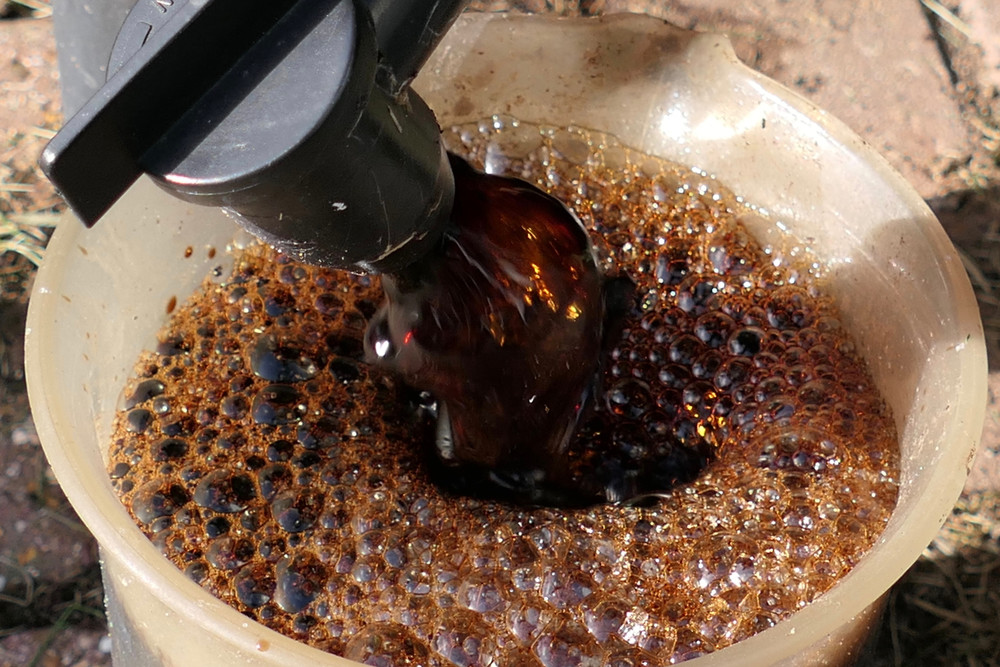
First, look for a container with a spigot near the bottom that lets you drain out excess liquid (called leachate) to keep the worms from living in a swamp-like environment. This feature reduces potential odors, too.
Getting a bin with multiple stackable layers with holes between them is also essential, as this allows you to boost the compost capacity of the system without having to clean it out between harvesting.
However, some people have success with breathable fabric composters instead, like those offered from Urban Worm Farm.
2. Get a Worm Supply
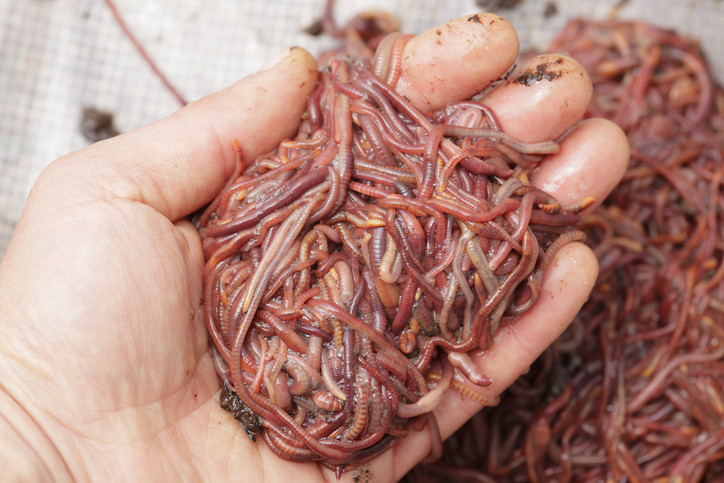
While it might be tempting to dig through the garden for an earthworm supply for your bin, you’ll do far better with red wigglers instead.
This scrappy species thrives in worm bin conditions because they prefer to live in the top few inches of leaf litter and other detritus on the forest floor.
Their voracious appetites and penchant for reproducing means that starting with a pound (approximately 800-1,000 worms) will keep a standard bin well supplied.
You can buy worms online and have them shipped straight to your house. Uncle Jim’s Worm Supply has really good reviews. Alternatively, check with local farms, bait shops, or vermicompost enthusiasts near you to source a supply.
An even easier option? Check out findworms.com to identify worm farmers near you.
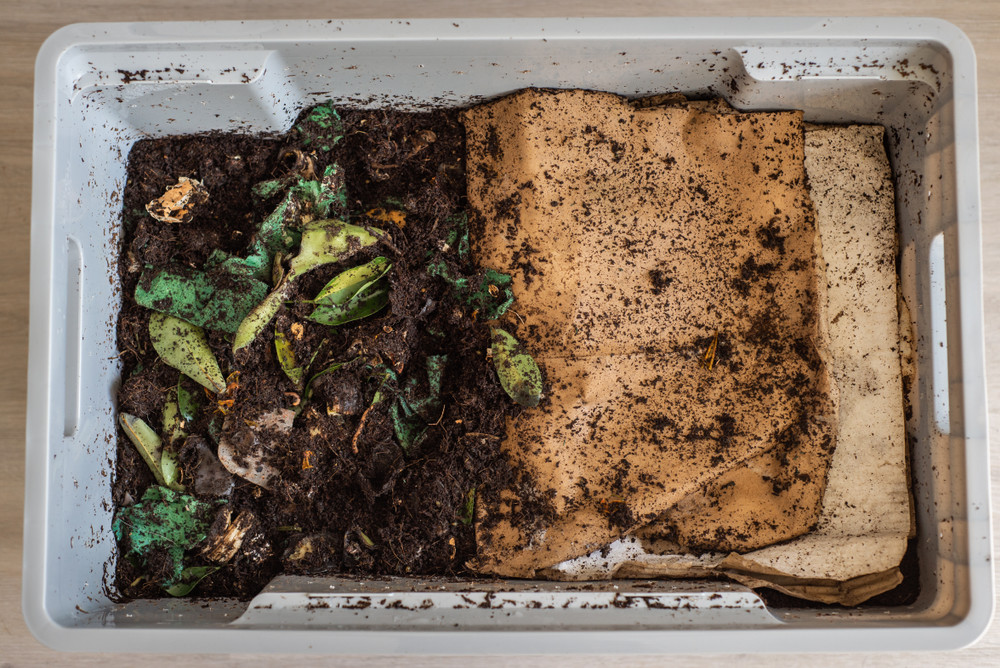
3. Prepare the Bottom Tray
Establishing a worm bin for the first time begins with the bottom tray. This forms the foundation of the system and should be filled with moistened, shredded paper (newspaper works well). Make sure that the bedding is “fluffed” up to provide airspace and allow excess moisture to drain through.
Add one or two cups of quality garden soil on top of the bedding to introduce beneficial microbes into the system. This helps break down material in the tray even before the worms arrive so that it’s easier for them to digest.
4. Set Up a Feeding Tray
Only the top tray in a vermicompost system contains food scraps, which is why it’s called the feeding tray. You can set one up by covering the bottom of the tray with a few sheets of dry newspaper (especially important if the tray has small holes along the bottom.)
Note: the newspaper layers are only needed for the first feeding tray, not the ones that you set up in later weeks.
Next, add moist bedding material evenly across the newspaper. This includes carbon-based material like cardboard, paper and junk mail, unsalted nut shells and dry leaves. In one corner, add 2-3 cups of food scraps that fall into the following categories:
- Fruit and vegetable scraps, peelings, rinds, and seeds.
- Eggshells
- Cardboard
- Tea bags and coffee filters
- Used paper towels
Worm bins shouldn’t include animal products of any kind. Be sure to avoid filling your container with:
- Meat scraps
- Dairy products
- Fats (both animal and plant-based)
- Bones, skin, and other animal byproducts
- Anything coated in vinaigrettes or heavy sauces
While these products tend to make fine compost, they are difficult for worms to digest and slow down the functioning of your system. They also tend to smell because they spend more time in the bin before breaking down.
Once you add the food, layer it with wet newspaper and secure the bin’s lid in place. For future feedings, plan to give the worms equal parts food scraps and bedding material.
5. Add the Worms
Once you have your bin set up, adding the worms is a simple process. Add them (and any moist bedding material they were shipped in) to the top feeding tray. The move might be stressful for the worms, so it can take a week or more for them to adjust to the new conditions before they begin eating in earnest. To ease their transition and prevent them from attempting to escape the bin, shine a bright light on the top to encourage them to burrow deeper into the container.
Uncle Jim’s offer red wigglers in numerous quantities from here on Amazon.
6. Add Additional Trays
You can add food scraps and bedding material to your bin every few days, or whenever the levels run low. Once the worms have filled the first tray with small, pellet-like castings, add a second tray on top to use as a new feeding tray. You can get it established by lining it with shredded bedding material (no dried newspaper this time), adding a cup or two of food, and layering the top with wet paper.
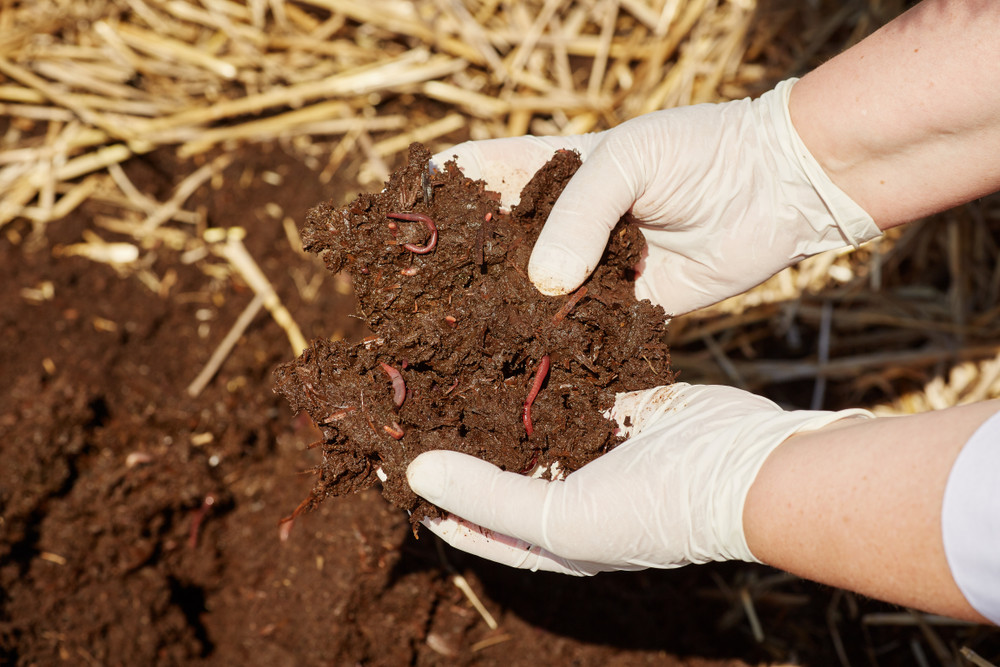
7. Harvest the Castings
Over several months, your worm bin will begin to get filled with castings and composted bedding material. As you build up layers of new feeding trays, the worms will continue migrating to the food-filled top ones, leaving the bottom trays devoid of worms but filled with nutrient-rich, microbially enhanced decomposed material. You will know that the compost is ready to use when the lower tray’s material is small and crumbly and without large food or bedding chunks mixed in. This typically takes three to four months.
You can harvest the castings without affecting the functionality of the system by pulling the bottom tray out of the bin and placing it on top of the feeding tray. Leave the lid off so that light can hit it and use a small hand rake to gently sift the soil around. This will cause any lingering worms to burrow back into the layers below, and you can take out the compost to use immediately or store away for later. The now-empty tray can be added back to the system as new food trays.
8. Use the Finished Vermicompost
Your worm’s hard work has all paid off, and you now have a plentiful supply of garden compost to put to use. A few methods for gardening with castings include the following:
- Add a small scoop to planting holes before putting in transplants.
- Use them to top dress the soil around your plants throughout the season.
- Soak them in water for several days to create a microbially-rich compost tea to spray on plant leaves.
- Use as an ingredient in homemade potting soil
Maintaining a worm bin is a fulfilling, minimal commitment way to get a second use out of your home’s garbage supply. Set up a worm bin today, and you soon might find yourself with a healthier garden than ever and forever on the lookout for extra food waste for your hungry horde.
Pin This To Save For Later