After tending a fruit and veggie garden all summer long, being rewarded with a bumper crop or two is a wonderful feeling. And you definitely don’t want any of that fresh, homegrown food to go to waste!
If your basket runneth over this season, here are 6 techniques you can employ to help preserve the harvest and enjoy the fruits of your labor:
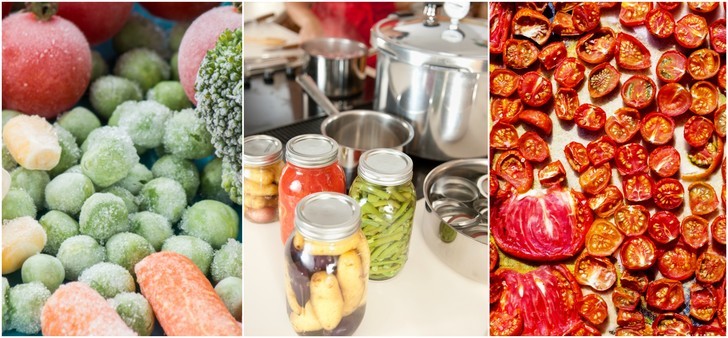
1. Water Bath Canning
For high acid foods with a pH of 4.6 or less, water bath canning is a tried and true method for preserving nutrients while maintaining a shelf life of about a year. It works by heating the food to a temperature of 212°F for the time specified in the recipe to destroy molds, enzymes, yeasts, and bacteria.
Water bath canning works well for apples, peaches, nectarines, apricots, pears, plums, tomatoes, grapes, cherries, lemons, papaya, mangos, and pineapple.
Always choose the best quality fruits for canning – they should be free of disease and mold and be at their peak ripeness. It’s best to begin the canning process shortly after harvesting the fruits from the plant. Wash produce thoroughly and ensure all work surfaces are clean.
To get started, you’ll need a water bath canning kit and a set of mason jars. You’ll also need to decide on what recipe you’ll be using for canning. Here is a great resource for free water bath canning recipes. Whether you choose a jam, sauce, puree, salsa, or preserve, it should be warm and ready to go before you begin canning.
Step by Step Instructions for Water Bath Canning:
- Sterilize your containers by filling the pot with water and placing as many empty jars as can fit. Bring to a boil for at least five minutes. Also toss in the metal lids and screw bands.
- Carefully remove the jars with a jar lifter and place on them on a dishtowel on your counter.
- Fill each jar with your warmed preserve recipe. Be sure to leave the proper amount of headroom according to your specific recipe.
- Once the jar is filled, wipe away any spillage from the jar’s lip and threading with a damp cloth. Screw on the lid top and snugly fasten the screw band.
- Set the jar rack into the pot and use tongs to place the hot jars within. Ensure they are completely submerged by at least one inch of water. Cover the pot and bring to a vigorous boil for the time specified in your canning recipe.
- Remove the jars and allow them to cool for 12 hours. Test the seal by pressing down on each lid. If the lid flexes at all, it isn’t properly sealed – you can always try to process it again or put it in the fridge and consume within two weeks. If the seal is nice and tight, store your jars in a cool, dry place out of direct sunlight.
2. Pressure Canning
Low acid foods with a pH above 4.6 can be safely preserved with the pressure canning method. It works by heating foods above the boiling point, to a temperature of 240°F or higher. The reason water bath canning is not suitable for low acid foods is because produce with a high acid content naturally hinders the growth of bacteria and do not require as much heat to destroy pathogens. Similar to pressure cooking, pressure canning traps steam and pressure within the pot, which allows the internal temperature to rise above 212°F.
Pressure canning works well for corn, carrots, green beans, peas, asparagus, mushrooms, okra, pumpkin, squash, and potatoes.
You’ll need a pressure canner, mason jars, and a delicious pressure canning recipe, prepared ahead and warmed.
Step by Step Instructions for Pressure Canning:
- Follow water bath canning steps 1 through 4.
- Fill the pressure canner with 2 to 3 inches of water and bring to a simmer, uncovered.
- Set up the canning rack inside the pot. Use jar lifters to carefully place the jars inside the canner. Make sure the water level is still 2 to 3 inches deep and add more water if needed.
- Set the pressure canner lid on top, locking it into place and leaving the vent pipe open. Set to medium-high heat, allowing steam to vent for about 10 minutes.
- Close the vent and wait for the pressure gauge to indicate the pounds of pressure recommended by the canning recipe. Once it’s ready, set the timer – most pressure canning recipes take anywhere from 5 to 15 minutes processing time.
- Remove the pressure cooker from heat and let it rest until pressure levels returns to zero. Remove the vent weight and lid, giving the jars another 10 minutes to cool.
- Using a jar lifter, remove the jars from the canner, setting them on a towel. Allow them to cool for 12 hours. Check seal by pressing on lids. Remove screw bands and try to lift the lids off with your fingers – if the lids do not come off, it’s well sealed. Store jars in a cool, dry, dark place for up to one year.
3. Freezing
Fast and easy, the freezing preservation method allows you to retain the vitamins and nutrients in your produce while lengthening the shelf life from one week to over a year. And best of all, it doesn’t require any special equipment.
Good candidates for freezing are green beans, corn, broccoli, carrots, berries, Brussels sprouts, cauliflower, dates, eggplant, and peppers. Fruits and vegetables with high water content, like potatoes, cucumbers, lettuce, and celery don’t freeze well and often become mushy after being thawed.
Most veggies need to be blanched (steamed or boiled in water) for a set amount of time and then shocked in cold water to preserve color, flavor, and texture. Before blanching, thoroughly wash the produce, and peel, trim, and cut to the desired size. Set up a bowl of ice water nearby to dunk your veggies in after blanching to halt the cooking process immediately.
Not all produce needs to be blanched before freezing. Berries, onions, and herbs can be trimmed and placed directly into the freezer. Otherwise, here are some recommending blanching times:
| Produce | Blanching Time |
| Asparagus | 2 to 4 minutes |
| Broccoli | 3 to 5 minutes |
| Brussels sprouts | 3 to 5 minutes |
| Carrots | 2 to 5 minutes |
| Cauliflower | 3 minutes |
| Corn (kernels) | 4 minutes |
| Eggplant | 4 minutes |
| Green beans | 3 minutes |
| Lima beans | 2 to 4 minutes |
| Peas | 1 to 2 minutes |
| Peppers | 2 to 3 minutes |
Once the fruits and veggies are blanched and chilled, dry them off and place into a freezer bag, air tight container, or vacuum sealed package. You can prevent berries and peas from sticking together by placing them on a large cookie sheet (make sure they are not touching each other) and set it into the freezer for one hour. Once hardened, they can be transferred to a container.
4. Dehydration
Drying food is among the oldest methods of food preservation, whereby water is removed from produce via evaporation by heat and air. Enjoy them as a crispy snack or tenderize them once again by soaking in cold water for 30 to 90 minutes.
The dehydration method works well with a wide range of fruits and vegetables: apricots, apples, peaches, berries, bananas, tomatoes, dates, cherries, potatoes, grapes, pears, plums, figs, pineapple, carrots, corn, onions, pumpkin, celery, beans, leafy greens, peas, and beets.
If you are without a food dehydrator, you can still dry fruits and veggies in the oven or the sun.
Using the Oven
The trick to oven dehydration is heating the produce slow and low. If drying vegetables, blanch them first to speed up the drying process. Preheat the oven to 140°F and place trays of clean, trimmed, and prepped produce in a single layer on each baking sheet. If you have a lot of produce, you can layer it in the tray but it will need to be stirred regularly throughout the drying process. Oven drying can take anywhere from six to 24 hours. Test for dryness by removing a sample from the oven and allowing it to cool for a few minutes. It’s fully dehydrated when it is hard and brittle.
Sun Drying
If you reside in an area where the temperature outside is at least 85°F consistently with low humidity, good air quality, little rainfall, and a good breeze, you may have success with drying produce outdoors. Otherwise, fruits and vegetables can be strung up along a window indoors to take advantage of solar drying.
Though it can take several days to sun dry produce, you can speed up the process by first blanching vegetables and then roasting in the oven for 10 to 15 minutes at 175°F before setting them out in the sun. The high sugar and acidity of fruit means they don’t require these extra steps.
For best results and to increase airflow, food should be placed on a screen set atop a couple of cinderblocks. Cover food with cheesecloth to protect it from birds and insects. Each evening, it should be moved to a sheltered spot to prevent nightly moisture and morning dew from slowing down the drying process.
5. Fermentation
Another age old preservation technique, fermentation involves adding a culturing medium – such as salt, whey, or a starter culture – to foods to encourage the growth of friendly probiotic bacteria. Not only does fermentation boost the nutrient content of food, eating more probiotics carries benefits like improved cognitive function, mood, gut health, and immunity – to name a few.
You don’t need any specialized equipment to start fermenting – just a large mason jar with a tight-fitting lid. Using a fermentation kit, though, can make the whole process completely fool proof.
Pretty much any fruit and vegetable can be fermented. Here are 25 recipes to get you started.
6. Root Cellaring
Cool temperatures, high humidity, and good air flow creates the perfect environment for preserving perishable foods.
You don’t necessarily need to dig up your backyard to build a root cellar – an unfinished corner of your basement, a hillside, or simply a hole in the ground can be transformed into a space to stow your fruits and vegetables and prolong their shelf life for up to 8 months.