The art and science of root cellaring – that is, a structure built below ground to preserve foods over the long winter months – was vital to survival in the days of yore. Back before the relatively recent developments of refrigeration and supermarkets (with their year-round access to fruits and vegetables), root cellars provided a natural way to store foods by using the inherent cooling, humidifying, and insulating powers of the earth.
This practice goes back to prehistory. The remains of root cellars have been found alongside the ruins of ancient civilizations, especially in Europe. Settlers to the New World brought the knowledge of root cellaring with them, and perhaps your grandmother or great-grandmother kept a root cellar.
Though root cellaring may seem like a dated concept in the face of modern progress, there are numerous reasons to consider building a root cellar. As a means to stow food without the use of electricity, it is both environmentally friendly and economical. When you grow a bumper crop of vegetables or purchase seasonal produce in bulk, you’ll save money in the long run while also preventing food waste. Knowing you have a root cellar full of food also means you’ll have a sense of food security and self-reliance.
The Fundamentals Of Root Cellaring:
To keep fresh foods from perishing, root cellars must be cool, dark, and moist.
Temperature – The optimal temperature for a root cellar is between 32°F and 40°F. Depending on where you live, you’ll need to dig below the frost line to achieve temperature stability.
Humidity – The reason the refrigerator doesn’t preserve foods nearly as well as a root cellar is because it lacks humidity. Maintaining a humidity level of 70% to 95% is key to successful root cellaring.
Ventilation – Just as important, good air circulation within the root cellar will help prevent mold. Many root cellars have two vents – one to bring fresh air in and the other to move stale air out. Vent pipes should have a valve to control air flow as well as screens to keep rodents and insects out.
Root Cellar Foods:
Though it received its name because of its ability to preserve root vegetables, the root cellar can also keep many kinds of produce fresh:
| Produce | Ideal Temperature | Humidity | Shelf Life |
| Apples | 32°F to 40°F | 80-95% | 2 to 7 months |
| Beets | 32°F | 95% | 3 to 5 months |
| Brussels sprouts | 32°F | 95% | 3 to 5 weeks |
| Cabbage | 32°F | 90-95% | 3 to 4 months |
| Carrots | 32°F | 90-95% | 4 to 5 months |
| Celery | 32°F | 90-95% | 4 months |
| Garlic | 32°F | 65-70% | 5 to 8 months |
| Leeks | 32°F to 40°F | 90-95% | 3 to 4 months |
| Onions | 32°F | 65-70% | 5 to 8 months |
| Parsnips | 32°F | 90-95% | 2 to 6 months |
| Pears | 32°F | 90-95% | 2 to 3 months |
| Potatoes | 32°F to 50°F | 80-95% | 4 to 8 months |
| Pumpkins | 50°F to 60°F | 30-70% | 5 to 6 months |
| Radish | 32°F to 40°F | 90-95% | 2 to 3 months |
| Rutabagas | 32°F | 90-95% | 2 to 4 months |
| Shallots | 32°F to 40°F | 60-70% | 6 months |
| Turnips | 32°F | 90-95% | 4 to 6 months |
Keep foods tolerant of warmer temperatures along the top of the root cellar, and foods that require cooler temperatures toward the bottom. If you have extra space, you can also stow canned goods, cured meats, and aged cheeses in the cellar.
Root Cellar Builds:
You don’t necessarily need to dig up your backyard to have a root cellar. Here are some clever ways to enjoy the benefits without committing to a major construction project:
Basement Root Cellar
An unfinished basement can be the perfect spot for a root cellar – or as many simply call it, the cold storage room. Choose a corner with two exterior, foundational walls (ideally facing northeast) with access to a window. You’ll need to wall it off with stud and board to keep the cool air within and add insulation to keep the home’s warmer air out.
You can install some black out curtains in the window and open it occasionally for ventilation. But for more control, you’ll need to run two pipes into the cold room. Remove the window glass and cover it with plywood. Cut out two holes for the pipes. When situating the piping, try to space them out as far as possible inside the room to achieve good air flow.
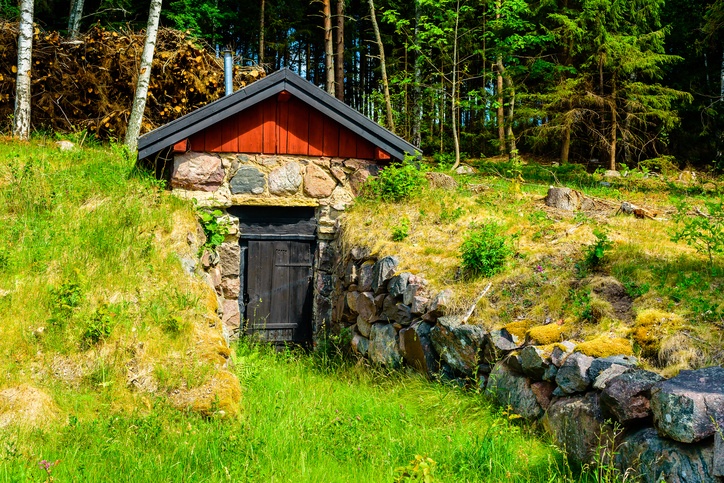
Hillside Cellar
If your property has some hilly terrain you can construct a root cellar into the side of a hill. Or you can create a hillside by hauling in some soil, which is called a ground-up cellar.
Traditionally, hillside root cellars were made of rock or stone. A modern approach is to bury a concrete septic tank by excavating the site, positioning the septic tank, installing a door and vents, constructing an entryway roof, and backfilling with sandy soil. Another option is to construct the walls and roof out of earthbags (or sandbags) and then covering the structure with soil.
Hole-in-the-Ground Cellar
For small-scale food storage, a hole-in-the-ground root cellar is a low-cost and much simpler endeavor. Select a suitable location and dig straight down. You can bury a wooden box, a metal trash can, an old fridge or a chest freezer (just be sure to remove the Freon, if any). The hobbit hole cellar is pretty basic too – a hole dug in the ground with a wooden door set on top to cover.
Root Cellaring Best Practices
Successful root cellaring will require some due diligence when first starting out. Follow these principles to enjoy fresh food in the dead of winter:
1. Creating the perfect environment
- As a general rule, total temperature stability is reached at a depth of 10 feet.
- Invest in a thermometer and humidity meter for accurate readings.
- Dirt floors will retain more moisture within the cellar than concrete or stone.
- To add humidity sprinkle water on the ground, place a pan or two of water on the floor, or place dampened burlap bags over the produce. You may also pack foods in moistened moss, mulch, or sand.
- When food becomes wet, however, it can hasten spoilage. If the air becomes too saturated with moisture, water will condense on the walls and ceiling.
- Keep the cellar dark by covering windows and always turning off the lights when you leave.
- Check temperature and humidity levels every day if possible.
2. Keeping the air flowing
- Always remember that warm air rises and cool air sinks.
- While an open window can supply all your air flow needs in a basement cellar, an enclosed cellar will require an intake and exhaust vent. Situate the intake pipe toward the ground and the exhaust pipe toward the ceiling.
- In the fall, open up the window or intake pipe to lower the temperature. Start closing it off once you’ve reached the 32°F to 40°F range.
- To keep air flowing, always place food crates and shelves a few inches away from the floor, walls, and ceiling.
3. How to Store Your Food
- Use wooden shelving and bins to house your food since wood will not conduct hot and cold temperatures like metal does.
- Always select the best fruits and vegetables to store. If the produce is bruised, dented, or has broken flesh, it will decay much faster. This will, in turn, cause the other foods in your root cellar to spoil so it’s advised to handle foods as delicately as you would handle eggs.
- Don’t wash produce before it goes into the cellar.
- Some foods need to be prepped and cured for long-term storage.
- Keep root vegetables in the ground until the first hard frost (four consecutive hours where air temperature is below 25°F) before transferring to the root cellar. This will prevent the shock of temperature fluctuations when you harvest early.
- Harvest produce when it has reached maturity – not over ripened or under ripe.
- Check foods for signs of decay and mold at least once per week.