• Skip to primary navigation
  • Skip to main content
  • Skip to primary sidebar
  • Skip to footer
Natural Living Ideas
  • HOME
  • NATURAL HOME
  • BEAUTY
  • ESSENTIAL OILS
  • GARDEN
  • GREEN LIVING
  • DIY & RECIPES

How To Make Your Own Natural Beeswax Candles

Debbie WolfePublished: Dec 17, 2018 · Modified: Sep 30, 2019 by Debbie Wolfe · This post may contain affiliate links ·

How To Make Your Own Natural Beeswax Candles

I love the look and smell of real beeswax candles. As a candle lover, I am drawn to the soft, filtering light they emit and, the fragrance. However, as studies show, artificial fragrances can have a negative impact on our health. Commercial candles are full of artificial fragrances. A 2001 EPA study shows that candles with more fragrance in them produce more soot, which can lead to indoor air pollution.

One way to steer clear of candles made with artificial fragrances is to burn beeswax candles. Yes, they are quite pricey compared to cheap paraffin candles, but they are not hard to make.

Beeswax candles also help purify the air instead of pollute it. They burn clean and emit negative ions when burned. The negative ions help to reduce dust, dander, and mold from the air we breathe.

We’ve written an entire article revealing why beeswax candles are the only type of candles you should consider burning in your home. You can read it here.

How To Make Your Own Beeswax Candles

Supplies

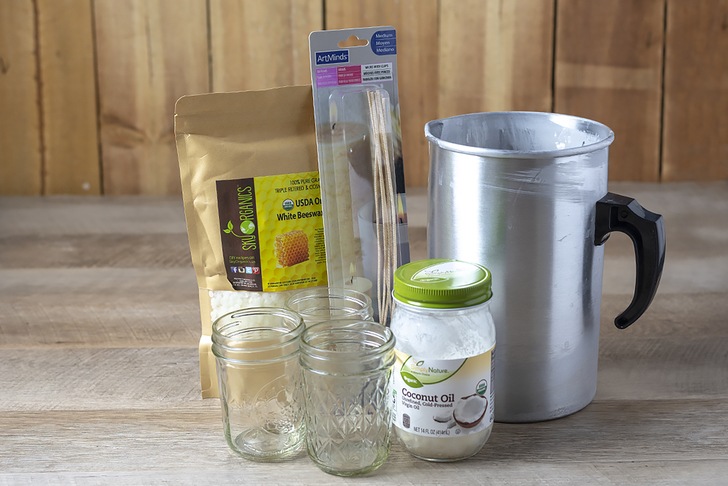
  • 1 lb filtered beeswax pellets
  • 1/2 cup coconut oil – This Spring Of Life Coconut Oil is currently my favorite.
  • 3 half-pint canning jars
  • 60 ply cotton braided wick (or a wick that is made for 2-3 inch diameter candles)
  • a metal pitcher (or empty can)
  • pot large enough to fit your pitcher to use as a double boiler
  • bamboo skewers


Instructions

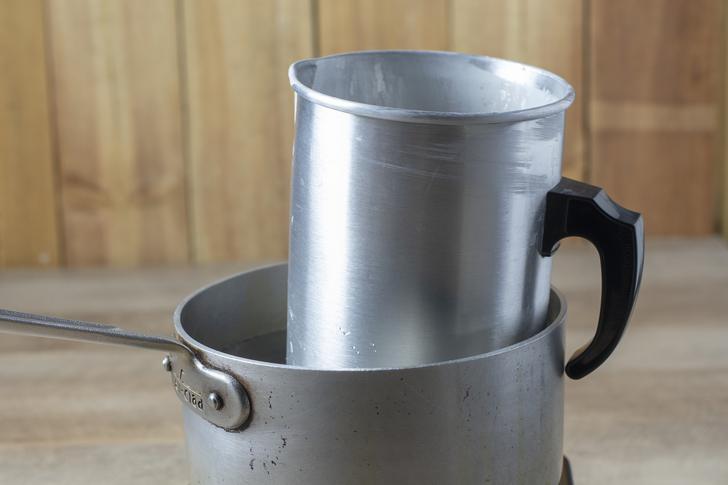
Place the beeswax pellets into the metal candle pitcher or can. Set the pitcher in a large pot and fill it with enough water to come up the outside of the pitcher. Heat the water to a low boil until the beeswax is completely melted.

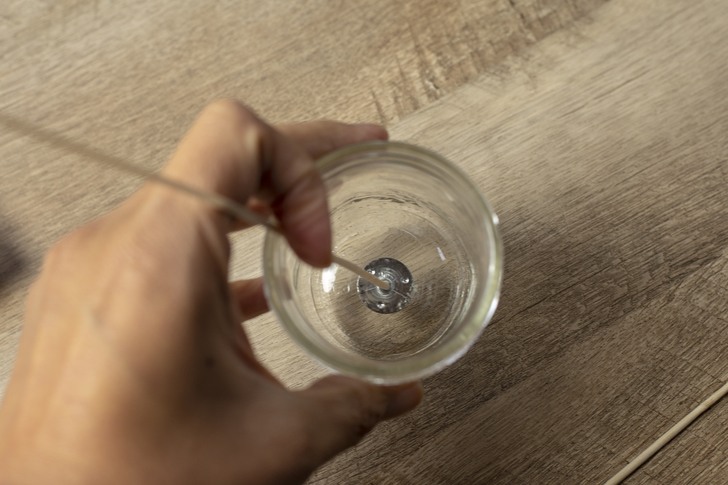
While the beeswax is melting, glue the wick’s base plate to the bottom of the glass jars.

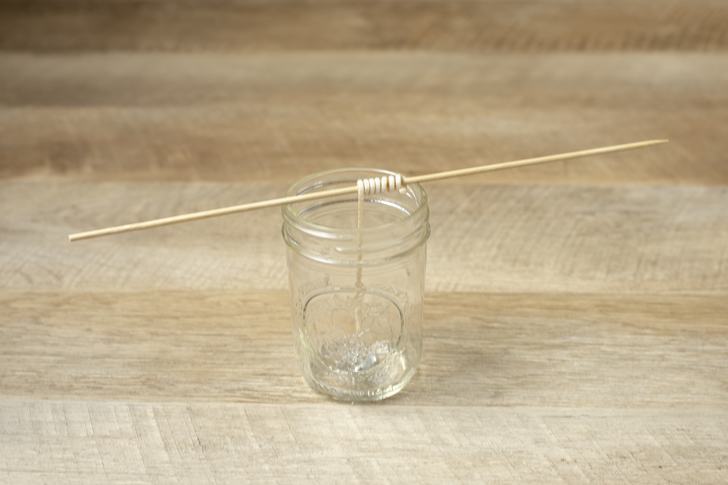
Twist the excess wick around the bamboo skewer to help hold the wick vertical.

Once the beeswax is completely melted, add in the 1/2 cup of coconut oil. Stir the oils until melted. Let the melted wax and oil cool for about three minutes. Then pour into the jars, leaving a one-inch headspace. Let the candles sit undisturbed for at least 12 hours.

How To Make Your Own Natural Beeswax Candles

Once the wax is firm, trim the wick to about 1/2 inch.

How To Make Your Own Natural Beeswax Candles

Light your candles and enjoy!

Read Next: 20 Magical Ways To Use Beeswax For Health, Beauty & In Your Home

Related Posts

  • 20 Epsom Salt Uses That Go Way Beyond A Relaxing Bath

  • How To Make Your Own Gel Air Fresheners With Essential Oils

    How To Make Your Own Gel Air Fresheners With Essential Oils

  • How To Make Herb Infused Oils & 3 Recipes To Try

    How To Make Herb Infused Oils & 3 Recipes To Try

Previous Post: « DIY Eyelash Growth Serum For Gorgeous Thick Lashes
Next Post: 35 Brilliant Gift Ideas For The Health & Wellness Lover »
Debbie Wolfe
Debbie Wolfe

Debbie is a mom of two rambunctious boys, wife, and work-at-home mom from Georgia. When not writing or crafting, she is in the garden or hidden away reading.

Debbie is an obsessive crafter, home chef, and gardener. She is a freelance writer and co-author and photographer behind the garden blog, The Prudent Garden. She is also a regular contributor to garden and crafting content for HGTV, DIYNetwork, and Great American Country.

Her first title, Do-It-Yourself Garden Projects and Crafts from Skyhorse Publishing will be available February 2019.

Primary Sidebar

6 Fragrant Herbs & Plants That Repel Flies

20 Epsom Salt Uses That Go Way Beyond A Relaxing Bath

23 Beautiful & Practical Ways To Upcycle Mason Jars In The Garden

  • Facebook
  • Instagram
  • Pinterest
  • Twitter

Footer

  • Facebook
  • Instagram
  • Pinterest
  • Twitter

FDA Compliance: The information on this website has not been evaluated by the Food & Drug Administration or any other medical body. We do not aim to diagnose, treat, cure or prevent any illness or disease. Information is shared for educational purposes only. You must consult your doctor before acting on any content on this website, especially if you are pregnant, nursing, taking medication, or have a medical condition.

Affiliate Disclosure: NaturalLivingIdeas.com is a participant in the Amazon Services LLC Associates Program, an affiliate advertising program designed to provide a means for sites to earn advertising fees by advertising and linking to Amazon.com. Pages on this site may include affiliate links to Amazon and its affiliate sites on which the owner of this website will make a referral commission.

  • ABOUT
  • Contact
  • Privacy Policy

Copyright © 2021 Natural Living Ideas on the Foodie Pro Theme

3.1Kshares