There’s nothing better than fresh-baked bread, but a standard oven is a boring strategy for making yours at home.
With just a weekend of work, you can build an earth oven for baking homemade bread, pizzas, pies and more, right in your backyard.
What Is An Earth Oven?
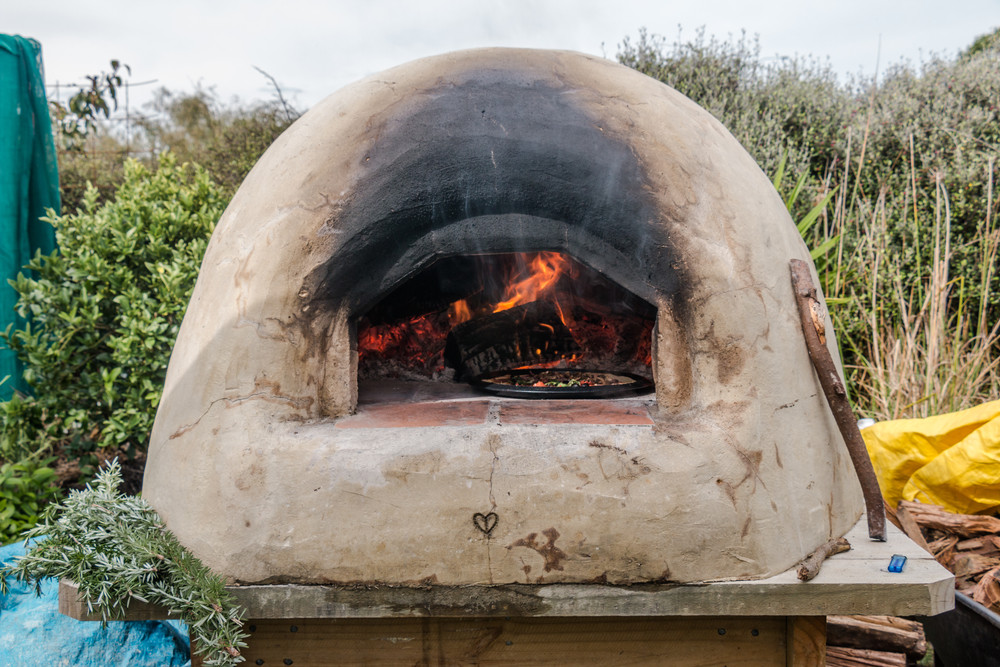
Never heard of an earth oven? You might know it by a different name: clay oven, cob oven, adobe oven, Roman oven, Quebec oven, or El Horno. Regardless of the terminology, an earth oven is a structure built from a combination of clay and straw that, when heated with fire, retains scorching hot temperatures for several hours so that you can bake bread quickly and evenly with little risk of burning it.
Since they get hotter than standard convection ovens, earth ovens can caramelize crusts and give them a chewier texture.
7 Benefits Of Baking With An Earth Oven
Why go through the effort of cooking with an earth oven when the one in your kitchen is more convenient? Below are some of the advantages of bringing your breadmaking outdoors.
1. Better For The Environment: Earth ovens are made from all-natural components, meaning that you can simply disassemble them when you’re done without creating any trash.
Likewise, the ovens are heated with wood, not a nonrenewable fossil fuel.
2. Provide Opportunities For Artistic Expression: The basic building technique for an earth oven can be modified any way you prefer, and you can personalize the appearance any way you prefer.
Consider building a backyard dragon, a troll, or merely making a beautiful design. You can also modify your plans to create a warming bench that takes advantage of the oven’s ambient heat.
3. Cheap To Build: The clay used to build earth ovens is cheap and abundant in the natural world, making it easy to gather your own before beginning.
4. Bakes Better Crusts: The conductive heat of an earth oven produces even cooking conditions that lead to thick, chewy crusts without tough spots.
5. Perfect For Social Gatherings: There’s no better way to make a cookout stand out than centering it around a backyard earth oven.
Let everyone design and bake a personal pizza, or bake sourdough bread for serving homemade sandwiches. The choice is yours!
6. Simple To Construct: Earth ovens are simple to construct even if you don’t have building experience, and they are very forgiving of imperfections.
7. Off-Grid Cooking: If you live in a place without consistent electricity, an earth oven might be the perfect option for baking.
Read Next: 21 Tips For Quitting Your Job, Going Off Grid and Living The Dream
Ten Steps For Building Your Own Earth Oven

Sold on the idea of getting fresh-baked bread from your backyard?
Then it’s time to start planning how to build an earth oven. The steps for constructing your own are as follows.
For more detailed instructions, Build Your Own Earth Oven is an excellent resource.
1. Choose A Location
Earth ovens are bulky and difficult to transport, meaning that it’s best to build your oven where you want it to stay permanently.
When choosing your location, keep in mind that you might need to make multiple trips to and from your kitchen when using it.
2. Collect Your Clay
The classic material for building an earth oven is clay subsoil. Some of the best places to find free clay include construction sites, the side of the road, or river banks.
You can recognize it by taking a pinch of dirt, spitting on it, and blending it between your fingers. If it feels sticky and greasy and you can roll it into thin snakes, you have clay.
If natural sources are too hard to track down in your region, you can also get clay by the bag from a masonry supplies store or buy it online.
3. Build The Foundation
Once you choose your location, chalk out the perimeter of your oven’s base and put down a layer of concrete blocks.
Plan on needing several dozen to create the right sized base.
The most straightforward strategy is to place the floor bricks in 10-15cm around the perimeter so that they form an even platform, minimizing any cracks or gaps in the process.
You won’t need any mortar, as the weight of the oven’s walls will keep them in place.
The goal is to create the foundation to a height that you’re comfortable learning down to, so once you achieve that you can fill the interior with an insulating material.
One option is to fill the space with empty glass bottles and then to fill the gaps with perlite before covering the top with sand.
Be sure to pack everything tightly together, as you don’t want the oven’s heat to be sucked from the bottom when you’re trying to cook.
Once you have a flat surface, lay firebricks on top. Your food will cook directly on top of them, so place the bricks tightly without any gaps.
Patience is key here, so use a level to keep things even.
4. Mix Clay Into Cob
The different levels of your oven require different consistencies of clay.
Plain clay won’t work for an earth oven because it will crack over time and let too much heat escape. This means that you will need to blend the clay with base materials to provide strength and reduce the risk of shrinkage.
A standard mix for the first layer is about one-part clay subsoil to two parts sand. You can test your mixture by forming bricks and letting them dry.
They should be dense and hard, with little evidence of cracks.
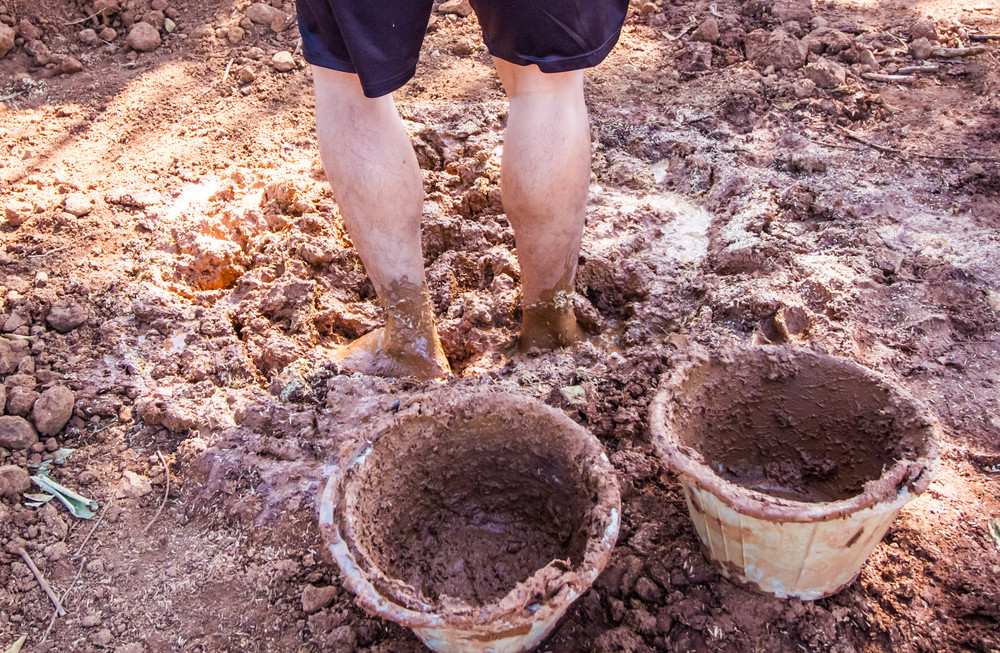
To mix up enough for constructing an oven, spread out a tarp and combine your cob components on top with enough water to keep things moistened and sticky.
You can stomp the mixture into mud with your feet or blend it by hand until it is well mixed and has the consistency of a piecrust.
Once you can pack the clay into a hard ball and drop it from chest height without it falling apart, you’ve made it the right consistency.
5. Form The Oven Interior
To construct a hollow oven, you first need to build the negative space inside it. The best way to do this is to mix sand with water so that it sticks together and you can form it into a stable mound.
Make sure this mound stops at least six inches before the edge of the firebricks, so you have space to build thick walls.
6. Build The Walls
Next, start layering your cob mixture on the sand base to form your walls.
The first layer should be about three inches thick. Start from the bottom and work upwards, ensuring you make the walls the same thickness throughout.
Be sure to cover the whole mound, even where you plan to put a door.
Let this layer set overnight, and then add a second layer that’s mixed hay or straw to add thickness. This layer should be at least three inches thick, and it should be flush with the first layer so that there aren’t gaps.
The depth of your oven is a personal choice. Thicker ovens hold heat longer, but they also require more fuel.
7. Form A Door
Generally, earth oven openings should be about two thirds the final height and about 30-50% of the inner diameter.
Scratch a line in the cob for where the door will be and cut a fist-sized hole to get your hand in and dig out the material until you can touch the underside of the thermal layer.
If it’s firm and doesn’t dent, you can expand the entrance to full size without compromising its structural integrity.
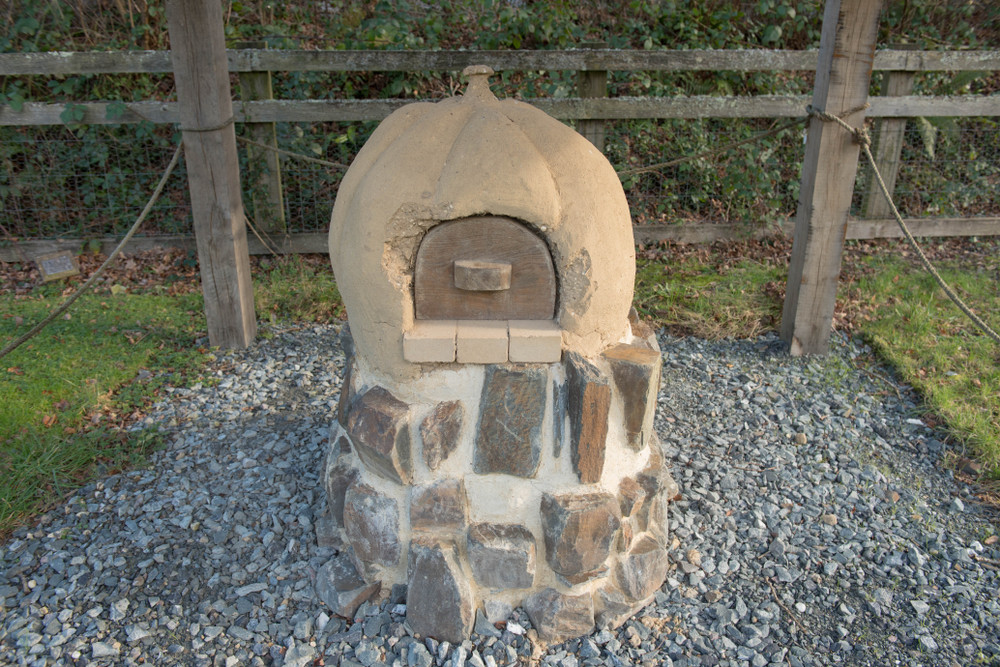
8. Coat With A Finishing Layer
At this point, your oven might look slightly rough on the exterior.
You can add a smooth clay layer to give it a polished look, and those feeling extra creative can form their oven into any shape or expand it into a bench or larger building.
One way to achieve a smooth texture is to rub the exterior with a polished rock, metal spoon, or piece of milled lumber.
9. Protect Your Oven
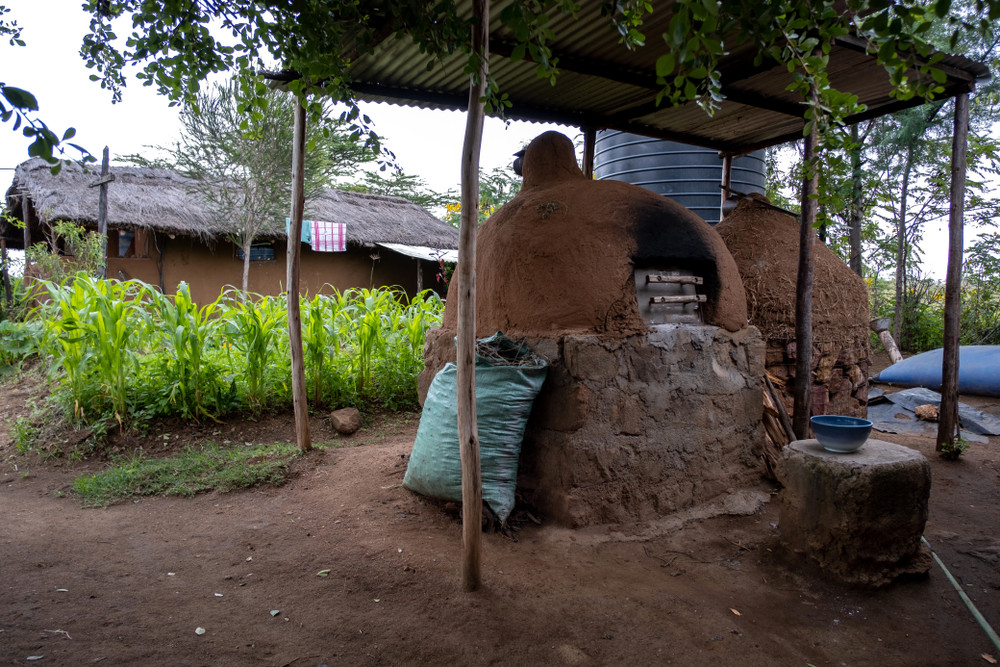
Since earth ovens are made from natural materials, too much water exposure will cause them to disintegrate. Most people solve this problem by building a basic roof to shelter their oven. Keeping it dry will also help it heat up faster, saving you fuel over time.
Note: Never “waterproof” your oven by painting it or covering it in cement. Earth ovens need to exhale steam as they heat up, and trapping water within the structure can wreck it quickly.
10. Drying The Oven
Once finished, your oven will need to dry out for several weeks before you can build a fire in it.
As it dries, slowly dig out the interior sand to allow air inside aid the drying.
During this time, you can build a wooden door that forms a tight fit on the oven’s entrance.
Small cracks might form during this process, and that isn’t a problem so long as they aren’t structural.
How To Use An Earth Oven
Once your oven is thoroughly dried, it’s time for the fun part- using it!
Learning to bake with an earth oven is a skill that takes some practice. You have less control over the process than with a regular oven, so plan on it taking a few tries to get things perfect.
You’ll want to have a supply of wood on hand before you start. Stick to small pieces that can burn hot and fast- no piece should be thicker than your wrist.
Scrap lumber is an option so long as it hasn’t been treated.
Heating The Earth Oven
To start, soak the baking door in a bucket of water for several hours. The more saturated it is with water, the lower the risk of it catching fire.
Soaking also allows it to produce steam during the baking process, which keeps your bread moist.
As the door soaks, build a fire on the oven floor.
It’s best to burn several small loads of wood in rapid succession to reach the desired baking temperature. You can estimate the internal oven temperature by pressing your hand on the outside.
The goal is to make it hot but not unbearable after about two seconds on contact. If the oven has been used before, you can also gauge when it’s ready by when it burns the black soot off the exterior.
Plan on the heating process taking between one and three hours, depending on the size of your oven.
The hotter the better for pizza, so don’t be afraid to keep the fire going for longer than you think is necessary.
Once the oven reaches temperature, pull out the coals into a metal ash bucket, ensuring that embers aren’t trapped on the edges. The oven will be too hot to leave your hands in for long, so use oven mitts.
You can use a fireplace brush to remove the remaining ashes from the cooking space.
Next, you need to “soak” your oven in heat to even out the internal temperatures for better baking.
Accomplish this by covering the opening with a metal cookie sheet (not the oven door) and letting the oven set for 15 to 30 minutes. You can gauge the temperature as you go by holding your hand inside.
If you can last eight seconds, it’s ready for bread. Any hotter, and it’s best to bake pizza or wait for things too cool down.
Baking With An Earth Oven
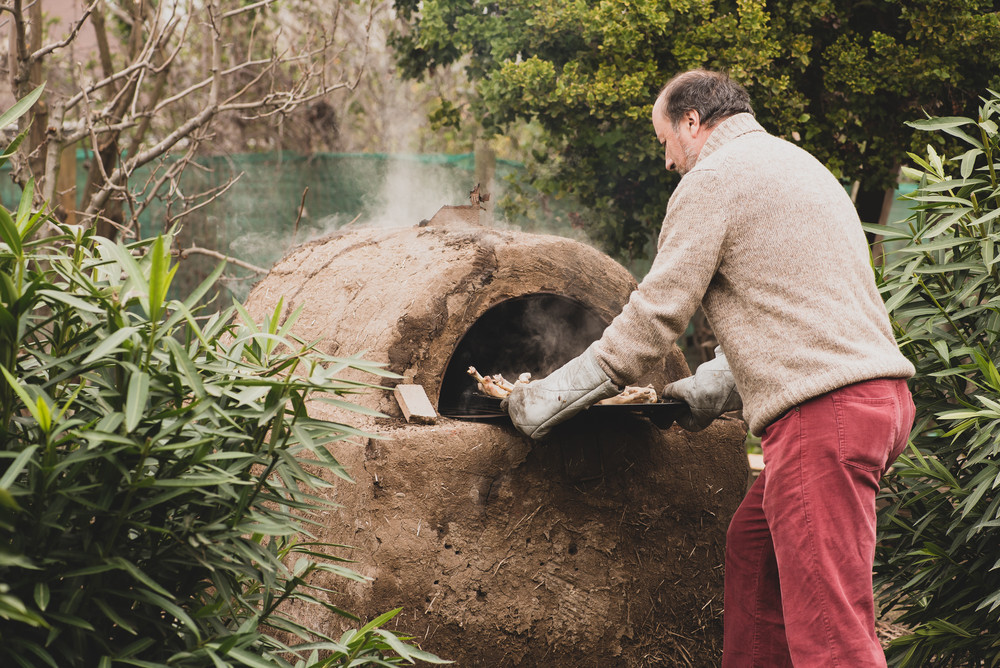
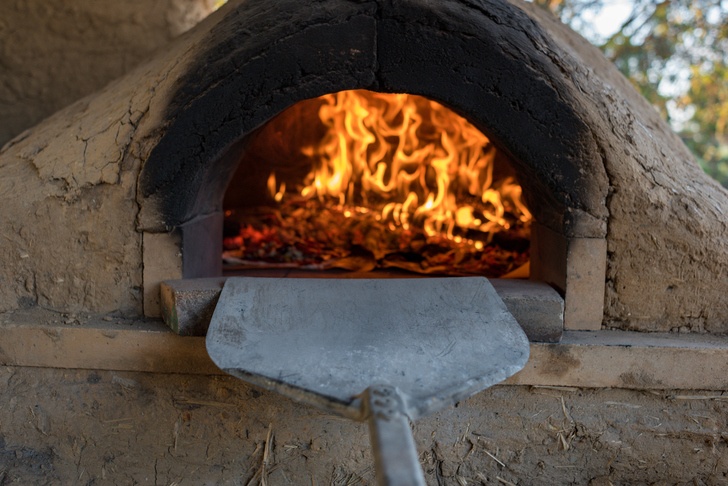
To bake, load your loaves into the oven on a narrow wooden paddle known as a peel. Sprinkle cornmeal on the peel first for easy transfer to the oven floor.
Once loaded, block the opening immediately with the baking door.
Check your bread every few minutes while it’s baking to ensure it doesn’t burn. The process is less scientific and more intuitive, so practice makes perfect for gauging the timing.
Once the crust is brown and textured, pull it out of the oven.
As your oven will retain heat for several hours, you can cook multiple loaves and switch to lower temperature foods as it cools down. A typical order is a to bake pizza, then bread, casserole, and cookies or brownies.
Baking homemade bread in your backyard is an exquisite experience, especially if you take the time to learn how to make an earth oven.
Take the time and effort to construct one today, and you will reap the rewards for years to come.