Spring is in the air! It is time to add some unique personality to your garden area. Instead of spending a fortune on new garden art or furniture, why not consider upcycling?
Repurposing used objects by moving them from the house into the garden helps reduce clutter and extra spending, besides helping the environment.
Search the attic and basement, and even the stagnant pile at the bottom of your closet, for reusable items. You can look for recyclable materials outside the home but avoid the temptation to spend more on new stuff.
These simple projects are just samples of what you can do when you unleash your creativity.
1. Pallet garden furniture
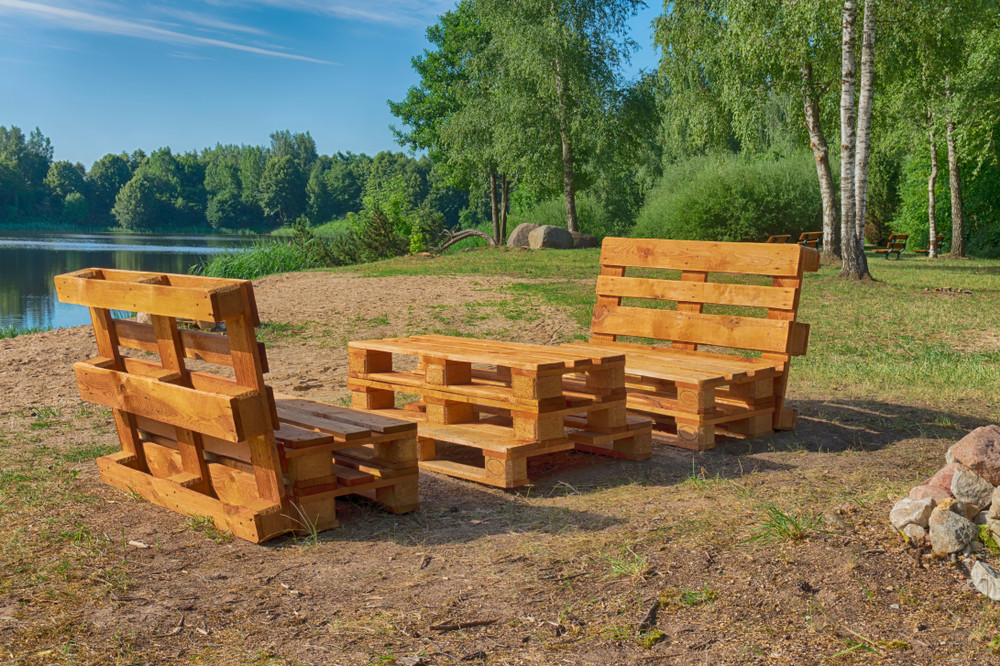
Pallets are lightweight, and just right for making garden furniture that you may want to move around occasionally. Lowe’s, Home Depot, heavy industries and construction sites are places to look for pallets. Don’t be reluctant to ask them.
Most of these pallets would otherwise go to the dump yard, so you’re actually doing a good favor to the companies as well as the environment. You can also look online on places like Freecycle or Craigslist for pallets.
First check the pallets for splinters and rough edges. Sand them down and apply a coat each of primer and paint. Allow to dry, and apply another coat of waterproof paint for outdoor use. Your pallets are ready for assembly.
Here are a couple of really neat do-it-yourself projects that use pallets.
Hanging bed
This is the simplest way to use a pallet. Attach sturdy ropes to all the four corners of the painted pallet and hang it from the branches of a tree at a height of 1 ½ to 2ft from the ground. You can nail down a piece of thin plywood on top, but it is optional. Paint or varnish your project to protect it from the elements.
Table
Add four wooden legs to a painted pallet. You will need wooden boards from a dismantled pallet. Cut eight pieces of the required length. Attach the long side of one piece to the long side of another at right angle to form an L-shaped leg. Repeat with all the pairs. Place the legs at the corners of the pallet so that they fit snugly into the L. Nail the legs on. Covering the top of the table with plywood is optional. Paint or varnish your project to protect it from the elements.
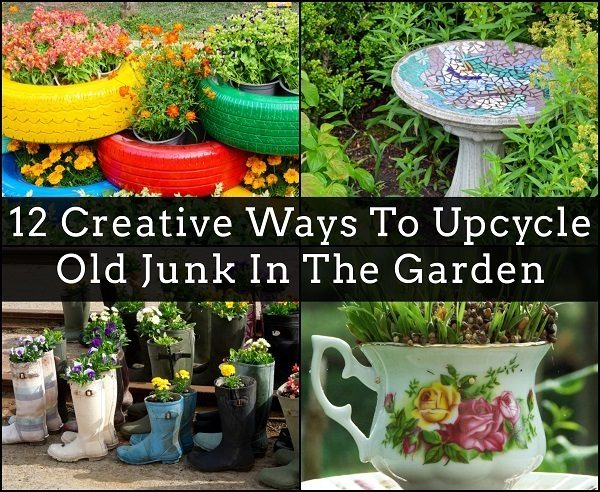
2. Old tires for growing flowers
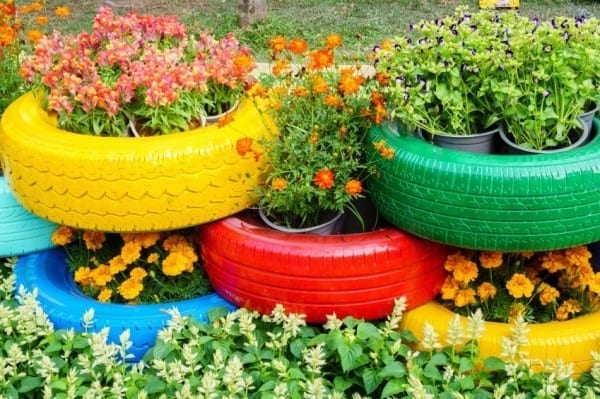
Millions of scrap car and truck tires are generated each year, and they pile up in vacant plots and solid waste management facilities. You can avoid adding to the already heavy load by recycling at least a few of them in your garden.
While you probably wouldn’t want to plant anything you plan to eat in an old tire (tires possibly leach harmful chemicals into the soil) you could certainly grow beautiful and aromatic flowers.
You can paint the tires in bright colors for a modern and fresh look, or leave them in their natural color.
3. Glass bottles for flower bed edging

If you have lots of glass bottles lying around, use them to make a neat, yet eye-catching border for your flower beds. Bottles in blue, green, and amber can make it more interesting. This is a simple recycling project the whole family, including young children, can take part.
You may need to collect lots of bottles before you start, depending on the size of your flower bed. Take an estimate of the number of bottles that would be needed. Usually three bottles can cover a foot, but you can get a more accurate idea by measuring the perimeter of the bed.
To do this, lay the garden hose around the bed and mark the total length. Divide it by the average diameter of the bottles you have. If you find that your stock is not large enough, source more from recycling facilities. Another way to go about it is to do the project section by section.
Get warm water in a large tub and immerse the all the bottles in it. You will find it easier to remove the labels after 30 minutes of soaking. Wash the bottles clean and leave them to dry. Dig a small trench around the bed and level it down, removing excess soil into a wheelbarrow. Water the trench lightly.
Starting from one end, push each bottle upside down into the soil until its neck is fully under the ground. You can use a small block of wood to tap them down. If you want all the bottles neatly arranged, work against a plank of wood as guide, but most people find an uneven border more aesthetically appealing.
After the work is done, water the border thoroughly to settle the soil, adding more from the wheelbarrow and tamping down with a trowel.
4. Old desk for seed starting
Old desks with several drawers filled with odds and ends that you no longer need can be repurposed for the garden.
Empty the desk and move it to a shaded portion of the garden. Give it a coat of paint to protect it from the elements.
Pull out the drawers after marking them so that you will know which one goes into each slot. Line the drawers with plastic sheet, covering the bottom and the sides to protect them from water splashes.
Sow the seeds in individual paper cups or seedling trays and water them lightly. You can arrange all the cups and trays inside the drawers and insert them into their original slots.
As you know, many seeds sprout well in darkness while others prefer a bit of sunshine. You can assign the top drawers for light loving seeds. Keep them fully open during the day and close them in the evening to keep them warm.
The drawers with seeds that require darkness can be kept closed until the seeds start to sprout. It is important to check every day for moisture and sprouting. You can keep the entire desk covered in plastic sheet at night to avoid frost damage.
Once most of the seeds have sprouted, you can pull out the drawers again and keep them where they get filtered sunlight. Some can go on top of the desk.
Gradually harden them off by giving them increasing amounts of light until they are ready to go into your garden beds.
5. Terracotta mosaic birdbath
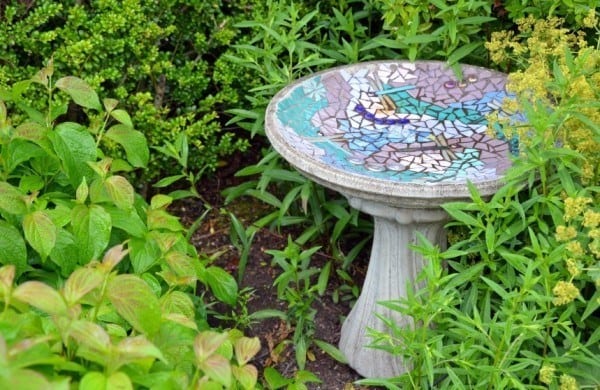
You can recycle old terracotta pots and their drip trays into this highly functional bird bath. Pots of different sizes and large trays work best. Create a beautiful mosaic with broken pieces of china to make it more appealing.
Scrub down the pots and the pans to remove all the dirt and algal growth. Sand the sides down to make it easier to paint. You can leave that part, as well as the painting chores, to children. Use rainbow colors and pretty designs to decorate the pots. Bright colors grab the attention of birds.
Stack the pots upside down, starting with the largest pot. A smaller pot will cover the large pot only partially so that the stack will grow faster. Make a tower of the desired height. Paint the outer surface of the largest tray and spread a thin layer of cement on its inner surface. Stick broken pieces of china into the cement. You can use pieces of colored glass and pebbles to make any attractive design of your choice. When the cement is dry, spread a layer of grout all over the mosaic, pushing it into all the gaps between pieces. Wipe off excess grout with a damp cloth and allow it to set for two days. Rinse out the tray thoroughly to remove all chemical residues.
You can attach the mosaic tray to the top of your pot-tower with cement or silicon glue. Fill it with water and be ready to welcome some feathered beauties.
6. Old boots for planters
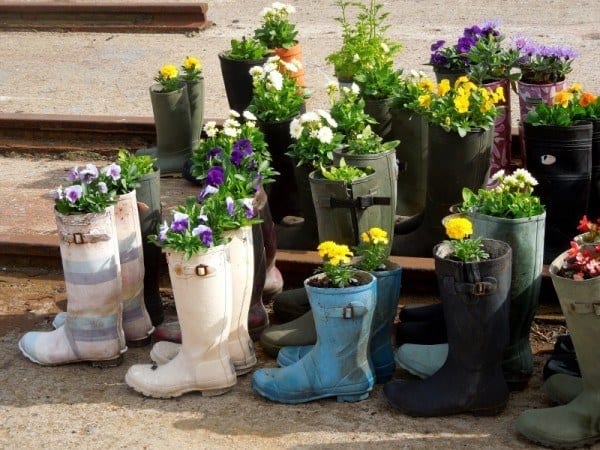
This recycling project is so popular that you can find boot-shaped planters on Amazon. But the whole point of recycling is to use the things you already have, rather than adding more to the clutter.
You don’t need to look for old boots of the same size, type or color. Different sizes are more charming. You can paint them any color or leave them as they are. Paint designs or quotes if you like.
The most important thing in this project is providing good drainage. Drill a few holes into the soles of the boots and fill them up with potting soil. Plant seeds or seedlings and arrange them in a place where they get plenty of sunshine. You can nail them up on wooden gates or fences or keep them on benches.
Old crocs can be used without any drilling as they already have plenty of holes. Just hang them up by the heels after lining the front part with a layer of sphagnum moss. Fill them up with soil and grow herbs and trailing plants in them.
7. Colander planter
Old colanders make excellent planters because you need not drill any holes in them. Just give a coat of paint to their exterior, if you like.
Line the colanders with a layer of sphagnum moss to prevent excess water loss. Add potting soil and plant with ornamentals that you would usually plant in hanging baskets.
Ferns, trailing plants and succulents that require good drainage are great choices. Hang up the planted colander by attaching plastic covered steel wire to 3 equidistant holes near its rim.
8. Old jeans planters
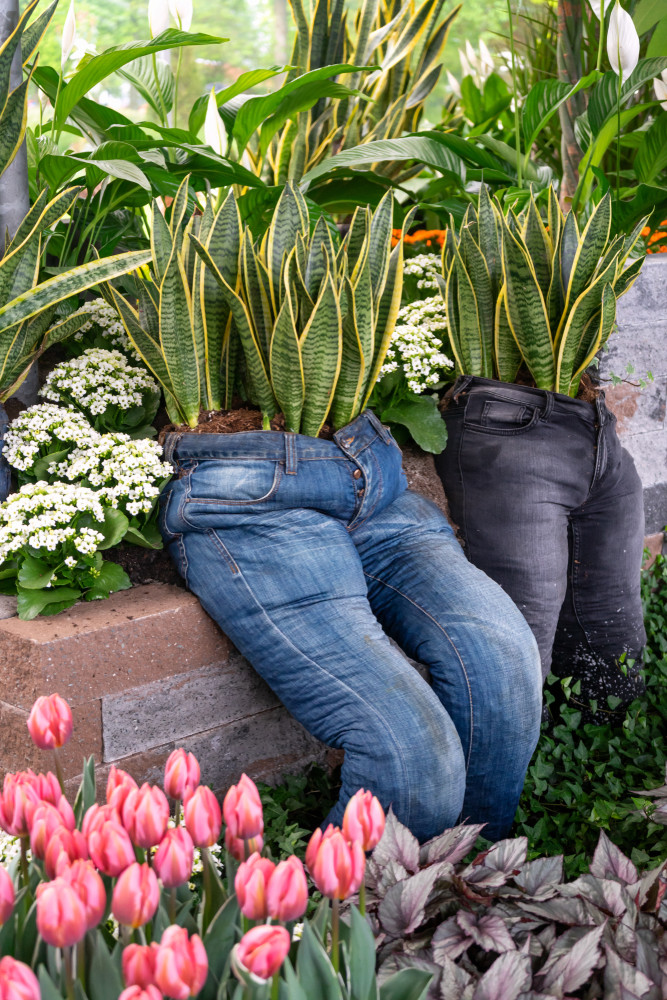
Denim is such a durable material that you can reuse it in a number of ways.
To make the planters, you can either cut off the legs of the jeans at the knees or just stuff them with straw. Staple the openings and fill with straw, sphagnum moss and potting soil. Filling the jeans is easier if you hook them up by the belt loops or nail them to a post or wall. Remember that soil can make them really heavy.
Plant potted ornamentals in the jeans planters arranged on the window sill or against a fence or wall. The larger ones can be used for growing vegetables like potatoes, sweet potatoes, carrots and radishes and salad greens.
9. Cup and saucer bird feeders
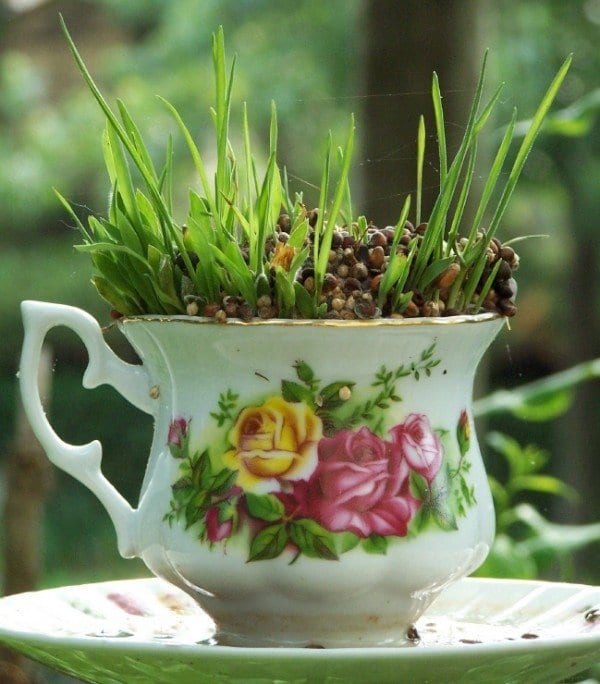
If you search the bottom or topmost shelves of kitchen cabinets you might come across several handsome pieces of china from tea sets that have lost many members to accidents. Give them a new life in the garden as birdfeeders.
To make a hanging feeder that requires no drilling:
Attach a sturdy string to the handle of the cup and hang it from a hook. It will hang slightly tilted to one side. Add bird seed to the cup to see how it hangs now. Stick the saucer in position to catch the grains that spill from the cup. Use a strong adhesive. Hang the arrangement from the branches of trees to feed visiting birds.
To make an upright feeder:
Just stick the saucer to the bottom of the cup. Stick the whole arrangement to the top of a sturdy PVC pipe fixed firmly in the ground. You can fix multiple feeders at different heights to cater to different types of birds.
10. Tin/Aluminum can bird feeder
Rather than toss your cans in the trash or the recycling bin, consider repurposing them for the birds. It is very simple to create hanging bird feeders.
Remove the labels and give the cans a coat of outdoor paint. You can decorate them further by sticking pebbles and shells on them. Take a long piece of dowel and attach it to the inside of the can with duct tape in such a way that it reaches at least halfway into the can, with 3 inches of it remaining outside. This will serve as a perch for the birds. You can also use an attractively shaped or branched twig.
Hang up the can by wrapping a wide ribbon around the middle of it so that it hangs horizontally. Fill with birdseed and watch birds feeding on it, happily perched on the twig.
11. Baby bathtub lily pond
Baby bathtubs are made of good quality plastic, but babies outgrow them all too fast. If you have one lying around, repurpose it in the garden to make a delightful little lily pond.
Choose the site of the lily pond carefully and keep the bathtub upside down there. Mark the outline. Now, measure the height of the tub and excavate the soil to that depth, making it slightly wider than the outline marked. Since baby bathtubs are small in size, you can probably dig out the soil in an hour or two. Remove the soil into a wheelbarrow and fix the bathtub in the hole so that its edges remain an inch below the soil line. Use a hose to push the loose soil down around the edges, adding more soil as necessary. Arrange smooth rocks or flagstones around the edges. Cement them down, if required,
Add 2-3 inches of coarse sand and pebbles to the tub and place one or two potted water lilies among them, weighing them down with rocks. Fill the tub with water almost up to the rim of the bathtub. You can plant around the pond to give it a more natural look.
12. Wheelbarrow planter
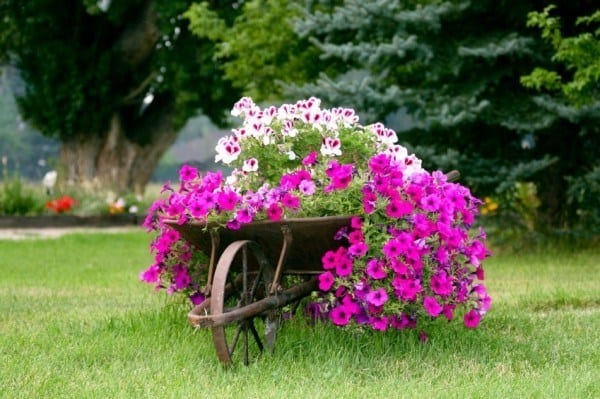
Even rusty old wheelbarrows with gaping holes and immovable wheels can turn into beautiful planters.
Just sand them down a bit and give a coat of paint. You can even give it a faux patina if you like. Select a nice spot in the garden for the spruced up wheelbarrow. Line it with plastic liner and arrange a variety of flowering plants to create a nice display.
Use some trailing plants like ivy to soften the hard corners. You can change the display according to the season, for example, filling it up with pumpkins and melons in fall.
The sky is the limit when it comes to recycled projects in the garden. The key is to have an open mind and be willing to use a little imagination!