Image Credit: Ruth Temple @ Flickr
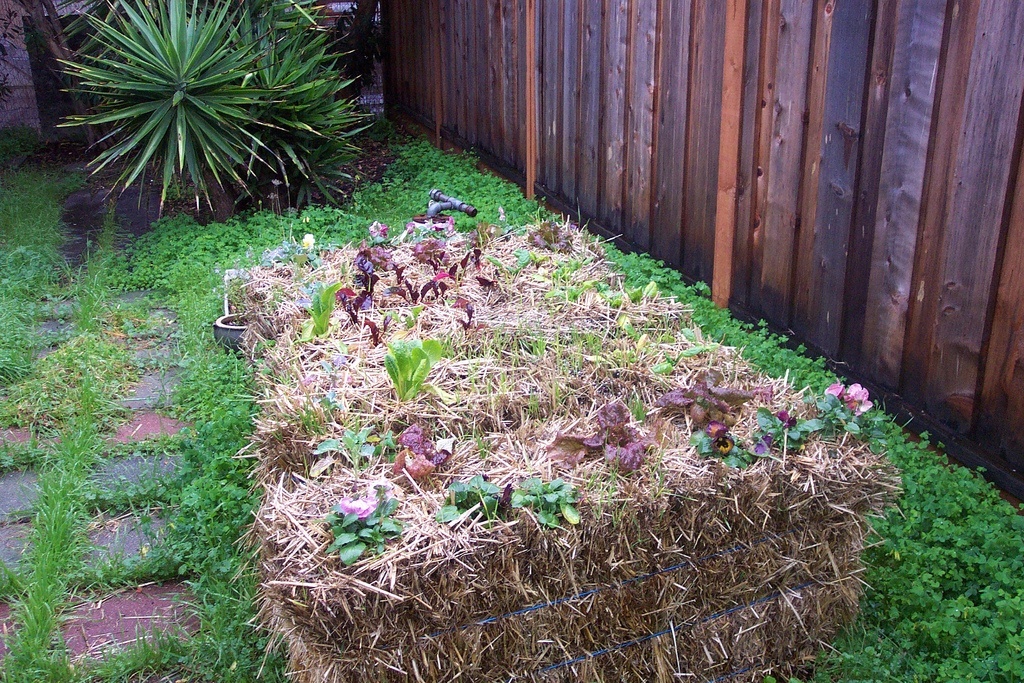
Straw bale gardening, a technique developed by Joel Karsten in his book “Straw Bale Gardens Complete“, is container gardening and raised bed gardening rolled into one, where the straw bales serve as the container as well as the growing medium. You simply stack bales of straw and plant in it. The straw gradually breaks down by the elements and time, with the additional help of plant roots and extra moisture that comes from regular watering.
10 Compelling Reasons To Try Straw Bale Gardening:
1. Grow your plants anywhere – It is suitable for any zone and climate. It has been tried in the tropical areas and places that fall within the Arctic Circle. In places with short growing seasons, straw bale gardening helps extend the season by a week or two both at the start and before winter sets in.
2. Suitable for any terrain – Unevenness of the terrain or rocky outcrops do not affect the beds as long as you can make sure the bales are stable.
3. Soil conditions don’t matter – Whether your soil is poor and sandy or clayey and waterlogged, it does not matter. You don’t have to test soil pH or do costly amendments.
4. No need to till the land – Straw bale gardening is ideal for those who love growing but hate tilling. You don’t have to so much as break the turf.
5. No need to transport soil and compost – Lugging large quantities of soil and compost to make enough beds to grow veggies is both heavy work and expensive. Straw bales are light, they come in neat bundles, they are easy to shift and move around. You need only very small amounts of compost for starting the plants in straw bales.
6. Growing and harvesting without straining your back – All gardening chores from planting the bales to monitoring the growth of plants, staking them when necessary, weeding, fertilizing, pest control, and harvesting the crop are done at a comfortable height.
7. Does away with containers and construction of raised beds – You don’t need to invest in containers or wooden planks for constructing raised beds. Straw bales are much cheaper. Although you need to get new ones every season, they are completely recycled at the end.
8. Weeding is a breeze – The few weeds that pop up are easily pulled out from the loose medium.
9. No more digging to get your root vegetables – Root vegetables are easily pulled out when they are ready. They come out clean and unbroken without any dirt sticking to them. Harvesting potatoes is by just overturning the bales.
10. Bumper crop – If all the above benefits of straw bale gardening does not appeal to the die-hard gardener in you, this should make you consider this technique. All other inputs remaining equal, a minimum of 25% increase in crop is guaranteed. The higher yield is mainly attributed to the excellent root run and air circulation the straw bales facilitate.
How To Start A Straw Bale Garden
Straw bale gardening almost seems like magic, but there’s a method to it. Straw has always been used in garden beds as winter mulch and sometimes as a substrate for growing certain types of mushrooms. But Joel Karsten is credited with developing straw bale gardening as a feasible technique for growing veggies and popularizing it with his book Straw Bale Gardens.
Here are just a few things to consider before starting a straw bale garden
Materials required:
- Straw
You obviously need straw bales. It can be bales of wheat, oats, barley alfalfa, or rye, but straw is always preferred over hay because the latter could be full of seeds that would cause a weed problem. Tightly packed bales of straw held together with twine are ideal.
- Compost
You need some well-rotted compost to start your plants in. You don’t need a lot, but just enough to fill the holes you make in the bales for planting the seedlings. A pound of compost for each planting hole is more than sufficient, but some gardeners use a layer of compost on the entire surface of the bale bed.
- Water
You need a regular supply of water to keep your straw bale garden flourishing. Straw conserves water, so the total water requirement may be lower than you’d need for growing the veggies in the ground, but you should ensure a regular supply.
- Fertilizers
The straw bales may provide a steady supply of nutrients to the plants as they slowly decompose, but it may not be sufficient to support a large number of plants. You can use any type of fertilizer as you would normally use in regular gardening. Overuse should be avoided, though.
Getting started:
1. Choose the location
Arrange the straw bales where you want your garden to be. An unevenness of terrain or poor soil need not be a concern when you use straw bales for growing the plants. The only things you should ensure are plenty of sun and water that all plants need for good growth. Straw bales are ideally placed with the cut ends of straw facing the sides.
2. Condition the straw bales
Straw bales need to be conditioned to make them suitable for growing plants. There are two main reasons. When exposed to the elements, straw bales undergo natural decomposition as all organic materials do. The breakdown process is exothermic; it releases lots of heat as in compost piles. You don’t want your seeds and seedlings to get cooked.
Microbes are in charge of this process of decomposition. They use up some of the nutrients in the organic material. If you add compost and plant your seedlings before the microbes are done with most of their work, they will use up the nutrients meant for the veggies too.
Moisture is required for the decomposition process, so you need to water the bales thoroughly. It takes about 2-3 weeks for the initial decomposition process to be complete. You can add some nitrogen fertilizers to accelerate it. 4 oz. of lawn fertilizer per bale is sufficient. Just spread it evenly on top of the bale and water it down.
Check the inner temperature of the straw bales after two weeks. If it is still hot inside, allow some more time.
3. Plant the straw bales
Pocket method or flat bed method?
Typically, small holes are made in the straw bales for planting. You can do it by either moving the straw aside or removing some. This is called pocket method, where each pocket should be 3 to 4 inches deep. Use finished compost or well rotted manure to fill the pockets. Flat bed method is a variation in which 2 to 3 inches of compost is evenly spread on the bales.
After adding the compost, water the bales thoroughly before planting. This ensures good rooting environment for your plants.
Seeds or seedlings?
You can plant either seeds or seedlings. Many gardeners prefer to seed their straw bales because the root system gets a better chance at spreading extensively into the straw bed. Straw bales provide good insulation and the slowly decomposing straw bales keep the roots warm, so you can sow the seeds earlier than you would do in the ground. This extends the season, so there’s no need to start the seeds early indoors and then transplant them into the bales. You don’t have to deal with root bound seedlings and transplant shock anymore.
If you start your seeds indoors to give them a head start in spring, you can plant them individually in the little pockets you have prepared in the bales. This may be a good idea in places where the growing season is all too short, even with the extension straw bale gardening offers.
Planting distance
The bales can be planted as thickly as you would plant a raised bed, maybe a bit more because straw allows good air circulation in the root zone. Trailing plants can hang over the sides of the bales, freeing up the top for plants with compact or bushy growth. For example, a bale can have one or two cucumbers planted closer to the edges and 2 or 3 amaranth or 1-2 bush beans planted in the center.
4. Watering the bales
The importance of regular watering cannot be stressed enough. Water percolates quickly down the straw layers, so you need to make sure that there is enough moisture in the root zone. You can ensure this by installing drip irrigation or using soaker hoses. If you don’t want to invest in such arrangements, use soda bottles or milk bottles with tiny holes as water reservoirs near each plant. You can fill them 2-3 times a week and they will ration the water to the plants.
5. Fertilizing
Your plants need all the help you can give them. Providing sufficient amount nutrients in right proportions is the key to growing healthy plants and ensuring a good crop in any type of gardening. Straw bale gardening is no exception even though the decomposing straw provides some amount of nutrients to the plants.
Watch out for signs of nutrient deficiencies
As all gardeners know, all plants need the macronutrients nitrogen, phosphorus, and potassium in large amounts and several other minerals in smaller quantities. Nitrogen deficiency becomes apparent in premature yellowing of leaves. Necrosis of leaf margins indicates potassium deficiency and purpling indicates a lack of phosphorus. It is always better to take preemptive measures than remedy the deficiencies after they become apparent.
You can choose to use regular chemical fertilizers with suitable NPK to match the specific needs of the crops you have planted. Natural fertilizers like fish emulsion and blood meal are a good choice for organic gardeners. There’s no restriction to using good quality compost, farmyard manure or vermicompost to enrich the straw beds. You can use compost tea or other liquid fertilizers as foliar sprays or in the water used for irrigation.
6. Weeding
No one wants these usurpers in their garden beds, but weeding is not a back-breaking affair in straw bale beds. You come across very few weeds, and they are easy to pull up. Some gardeners just tuck them into the bales where they will decompose, adding to the fertility.
7. Pest and disease control
Pests and diseases are much rarer in straw bale beds than you encounter in regular garden beds. Since the plants grow far removed from the soil, nematodes and other pathogens in the soil do not affect the plants. Since new straw is used every season, there’s very little risk of bacterial and fungal spores starting infections or carrying them from season to season. However, beware of undesirable organisms reaching your beds through compost and manure you add to the beds.
Insect larvae from the soil may not find their way up the bales and onto your plants, but some winged insects may zero in on your crops. Since plants are growing in raised beds, you can spot any diseases or pests as soon as they appear and take appropriate remedial measure immediately. Use mechanical, chemical or organic pest control.
The Best Plants for Straw Bale Beds
You can grow a mixed bag of veggies to cater to your needs and to make the best of your straw bale gardening. Almost any type of veggies and fruits that you raise annually can be planted, but it may not be a bad idea to avoid large plants like corn or big, spreading pumpkins.
Fruiting vegetable/fruit
- Tomatoes
- Peppers
- Cowpeas
- Bush beans
Trailers and climbers – Give trailers and climbers stakes for support or allow them to grow down the sides.
- Cucumbers
- Zucchini
- Watermelon
- Strawberries
Root vegetables – They should be grown just for the harvesting pleasure.
- Potatoes
- Carrots
- Radishes
- Turnips
- Sweet potatoes
Leafy greens – Greens do extremely well and remain disease free, enjoying their elevated position far away from the soil surface.
- Amaranth
- Lettuce
- Spinach
- Kale
- Chard
Cruciferous vegetables
- Cabbage
- Cauliflower
- Broccoli
- Bokchoy
Herbs
- Parsley
- Cilantro
- Basil
How To Grow Ornamentals In Straw Bales
Straw bale gardening is most commonly used by farmers for producing food, lots of it, with minimum effort and expense. But that doesn’t mean you cannot adapt it for ornamental gardening. Gardeners often grow marigolds and some other flowering plants on the straw bales for pest control and for attracting pollinators.
Planning a flower and foliage garden exclusively around straw bales is a personal choice, but you need to address the aesthetic concerns involved. Planting the sides or using props may help mask the bales.
Keep in mind that straw bale beds are generally good for only annuals because they tend to break down after a growing season. You can probably use several lines of bales at the back of your regular garden beds to have raised beds. They would help increase the vertical appeal of your garden.
Recycling the Spent Straw Bales
A good gardener wastes nothing. Straw bales after a season’s crop may not be suitable for another season, especially in places where warmer temperatures and rainfall break down the bales at a faster rate.
- The straw can be used as mulch elsewhere in the garden or use it to line walkways.
- There are still plenty of nutrients in the spent straw, so you can add it to the compost pile for complete breakdown.
- If you like to use winter cover crops, you can try sowing them on what is left over from the bales, and then add everything together to the compost pile for a good green-brown ratio.

![]() Want to learn more about straw bale gardening? Then pick up a copy of Straw Bale Gardens Complete – A Breakthrough Vegetable Garden Technique by Joel Karsten – the authority on straw bale gardening.
Want to learn more about straw bale gardening? Then pick up a copy of Straw Bale Gardens Complete – A Breakthrough Vegetable Garden Technique by Joel Karsten – the authority on straw bale gardening.