Strangely, potatoes often seem to get overlooked when it comes to growing a vegetable garden.
Apparently, some are under the impression that there’s really no reason to grow them as they’re fairly inexpensive to buy, and, after all, how much difference can there really be in taste?
But that couldn’t be more wrong.
According to the Environmental Working Group, the average potato has been shown to contain more pesticides by weight than any other produce.
Plus, those commercially grown spuds can easily be a year old by the time they get to your local supermarket. That’s why when you get them home, they usually last only a few weeks before they start sprouting.
So, what you’re eating is a much less than fresh vegetables. But, if you grow your own and store them properly, potatoes can last for months, while still being fresher than those you bought at the store.
As with most things, homegrown potatoes really do taste significantly better too.
While potatoes are often thought of as simply a comfort food, they actually offer a lot in the way of nutrition.
Just some of their benefits including lowering the risk of cancer, boosting heart health, improving digestion, lowering cholesterol levels, strengthening the immune system, protecting the skin, lowering blood pressure, reducing insomnia and managing diabetes.
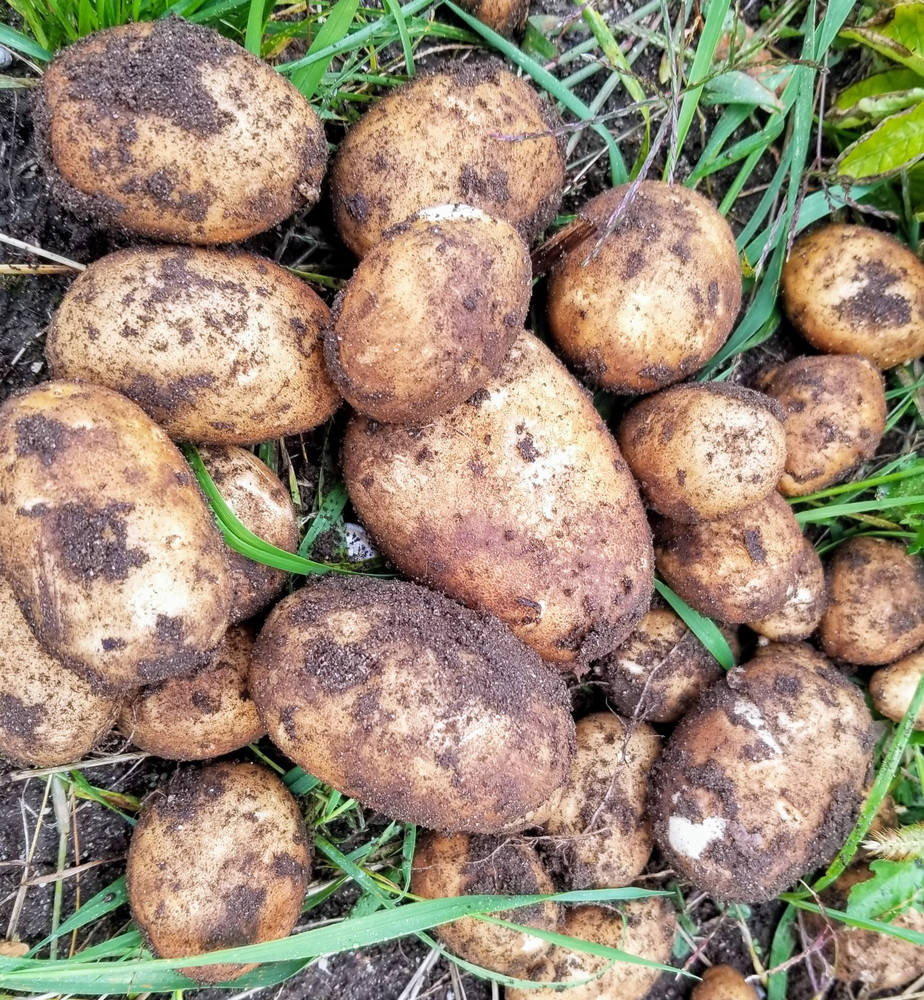
Not only that, but it’s fairly easy to grow sacks full of potatoes. And, when it comes to potatoes, it’s hard to have too many as they can be held fresh in a cool spot for months.
Of course, there are many different ways to grow them too, some of which are rather unusual, but they really do work!
1. 100 Pounds of Potatoes in Just Four Square Feet
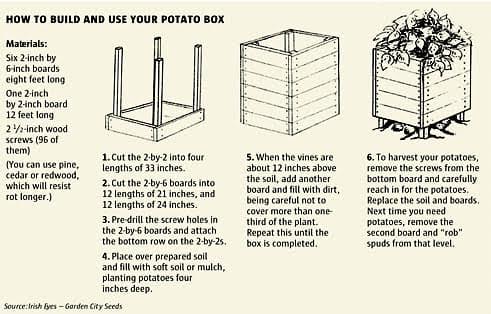
An article published in the Seattle Times a few years back discussed growing a whopping 100 pounds of potatoes in just four square feet.
While the original has disappeared, thankfully, many other sites, like ApartmentTherapy.com, picked up on it, and this method has really been taking off.
All you need for this technique is some lumber, seed potatoes, gardening soil, and of course, plenty of love and care. The guide for building it can be found here, and is shown below as well.
The recommended planting time is anywhere as early as April, and as late as August 1st, and it takes about three months before harvest. A few tips for utilizing this technique include:
Tips
Cut apart the larger seed potatoes, and ensuring that there are at least two eyes in each part you plant.
Dusting the cut pieces with first will help seal the open ends from bacteria.
Use 10-20-20 fertilizer and fertilize at planting as well as two other times during the season.
Water in a way that the plants will be kept at an even level of moisture.
Avoid planting in the same area in consecutive years, or using the same soil to fill your potato box to lessen the chance of your potatoes from contracting a disease.
If you’re short on space, build a box and plant inside of it. You can add sides to the box as it grows, and then fill in the new space with soil or mulch. When it blossoms, potatoes will be set in the added soil. Shortly afterward, you’ll be able to remove the bottom boards from the box and can reach in carefully to pull out new potatoes.
2. Trash Bag Potatoes
Growing potatoes in a trash bag is practically a foolproof way to grow potatoes and it only takes a few easy steps to do it.
The Method
One week before planting, place your seed potatoes in a warm spot. When sprouts that are about one-quarter-inch to one-half-inch form, they’re about ready to plant.
Cut large seed potatoes into chunks that are approximately two inches wide. Each piece should have at least two sprouts. After cutting the seed potatoes, allow them to sit at room temperature for three days.
Using a pair of scissors, cut a few drainage holes in the bottom of a 30-gallon plastic trash bag. Roll the sides of the bag down and fill it with about one-third potting soil.
Now, place the trash bag in an area of your garden that gets full sun.
To plant your seed potatoes, first, dust them with agricultural sulfur to protect them against fungal disease. Plant them by burying them with the eyes pointed up about two inches deep in the soil. Water thoroughly.
When your potato plants are six to eight inches tall, add more soil and straw to the bag. There should be just enough soil so that the top few leaves are poking through it.
As they continue to grow, keep unrolling the trash bag and adding more soil accordingly. They should stay well watered, but not soggy.
Now the fun part: harvest time. One clue that your potatoes are about ready for harvesting is that the leaves will yellow and the foliage will die back.
At this point, you should stop watering and simply leave them alone for a few weeks so that the skins toughen up. To harvest, slit open the side of the bag and release the potatoes.
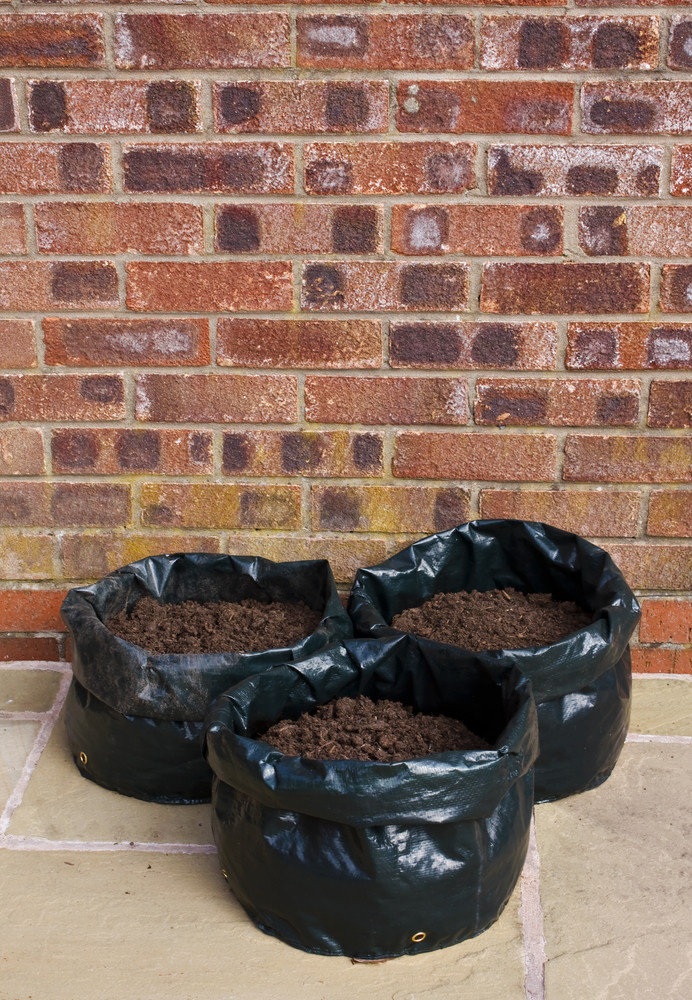
3. Commercial Grow Bags

You can also use commercial grow bags, which are made from heavy, dense polypropylene.
While they are a little more expensive than trash bags, they typically last for several growing seasons. You can buy a five pack of potato grow bags from this page on Amazon while some more options are presented below.
To use them, just place a few inches of a soil-compost mixture in the bottom of a bag, then plant four seed potato pieces. Cover them up with three inches of soil. Continue adding soil as the potato plants grow until the bag is completely filled.
To harvest, all you have to do is turn the bag on its side and dump out the contents. Considering the relatively small space, the yield is usually quite impressive.
4. Planting In The Ground With Straw Mulch
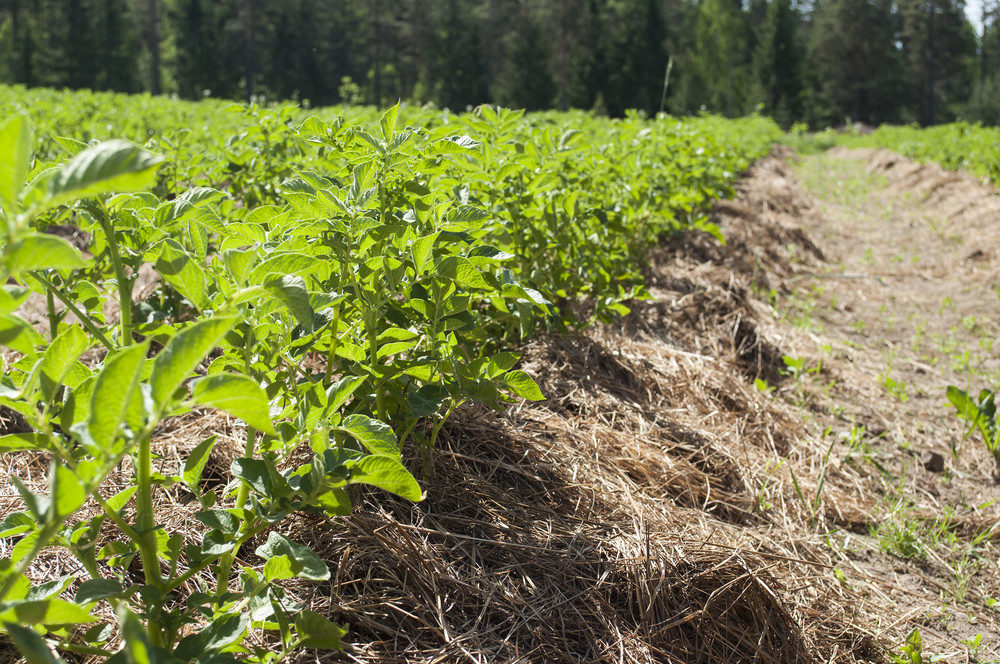
This method is one of the easiest around if you’ve got some room in your garden.
All you have to do is place your seed potatoes on the surface of prepared garden soil, about 8 to 12 inches apart. You can cut the larger ones if you want to, but it’s not necessary.
Now, cover them with three to four inches of loose straw. Once the stems grow to about 8 inches tall, add a little more straw.
Continue to do so until the plants are around 3 feet high and you’ve got a layer of at least one foot of depth. When the tops start to die off, it’s time to harvest.
Using this technique is particularly beneficial as the thick mulch works to conserve soil moisture while smothering any weeds.
When it comes to harvesting, it’s practically effortless, with no digging required. This method is also recommended for thwarting the Colorado potato beetle.
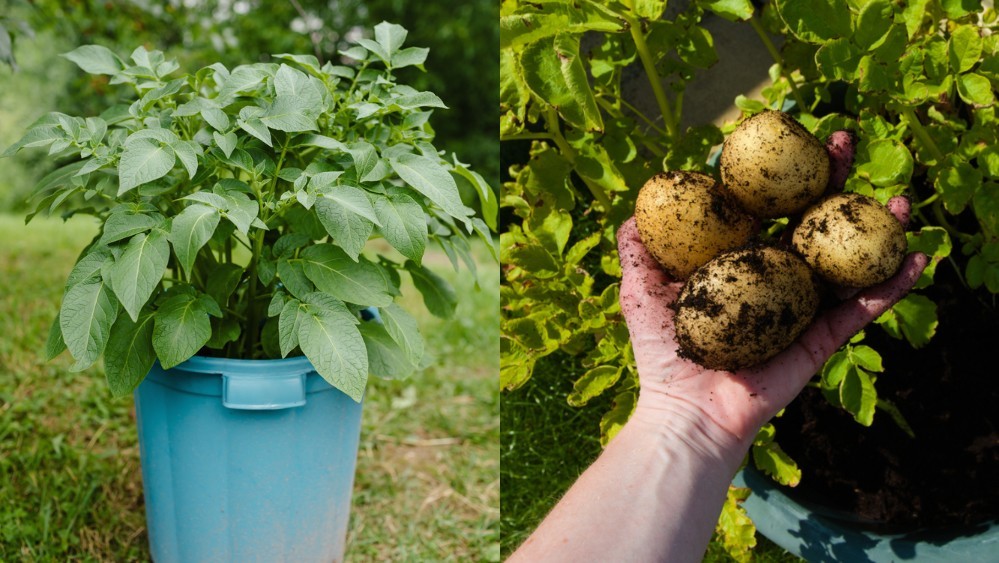
5. Bucket Potatoes
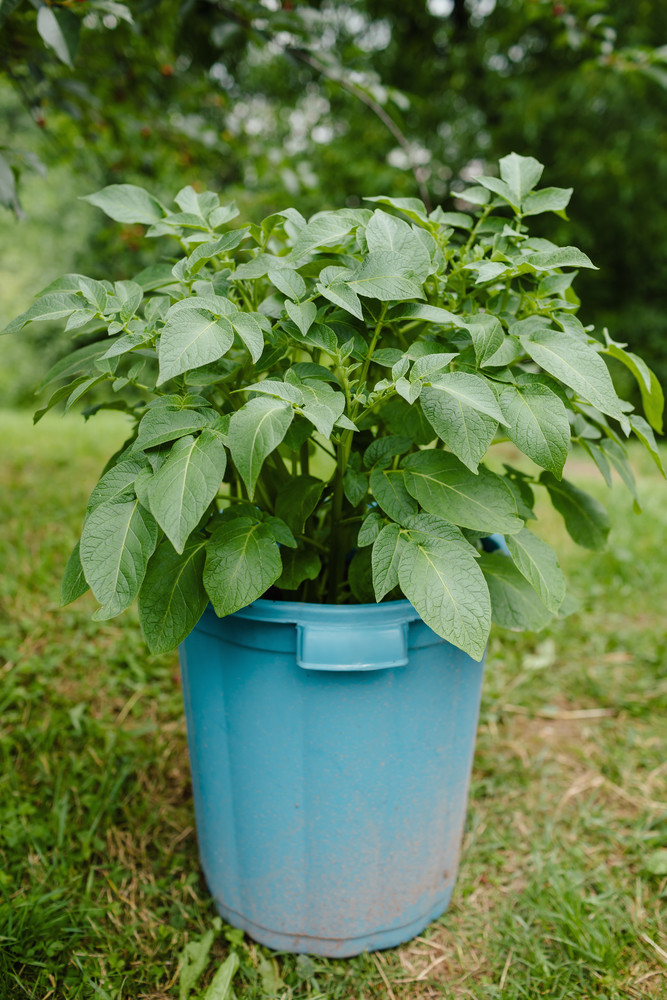
Potatoes are so easy to grow, they really can be grown in almost anything.
Not only will a trash bag work, but so will a 5 to 10-gallon bucket. Five-gallon buckets are ideal, as you can easily start them indoors and then transport them back and forth between the outdoors and in, depending on the weather.
First, gather your supplies:
- A bucket (preferably a 5-gallon bucket)
- Small rocks or pebbles (aquarium pebbles work well)
- Potting soil
- A black trash bag
- Seed potatoes (you can buy some at your local home and garden center, or use potatoes you have if they’ve started to grow roots)
The Method
First, add the rocks or pebbles to the bottom of your bucket to allow for drainage. Cover the bottom with about 1 to 2 inches to ensure proper drainage.
Fit your trash bag to the bucket by opening it up and placing it inside. You’ll need to cut it in order to achieve about a one-inch overhang. Using your scissors, make a cut to mark it and then lay the trash bag across the floor. Cut a straight line out of the bag and then put it back inside the bucket. Poke out about 20 drainage holes.
Add about 4 to 5 inches of potting soil to the bottom of your bucket, after the trash bag has been placed into it.
Now add your potatoes by placing three in the bucket on top of the soil, and then add about two inches of soil on top.
They need lots of water, so be sure to keep them well-watered, and it won’t be long before you’ve got a crop of potatoes. You may need to add more soil as they begin growing, so keep an eye on that too.
When the leaves start to yellow and the foliage begins to die back, it’s harvest time!
6. Wire Cage
You can also grow potatoes easily using a piece of wire stock fence rolled into a cage, it takes a very minimal amount of effort.
All you need is:
- A 10-foot-long piece of wire stock fence or similar sturdy wire fence
- Seed potatoes
- Fertilizer
The Method
If it hasn’t been cut already, cut your fence into a 10-foot-long piece and then roll it into a cylinder that’s approximately three feet wide. Fasten the end to the fence using wire to keep it together. You should now have a strong, yet easy to open cylinder that’s about four feet high.
Before planting, get your soil prepared by loosening it up and adding a little fertilizer, which gets your potatoes off to a good start.
Plant your seed potatoes like you normally would, into your garden soil, about three to four inches deep, and then hand tamp the soil around them.
Next, place your wire hoops so that they stand upright. Set them up around the seed potatoes you’ve planted, keeping them centered.
You’ll want to keep that space filled, so when your potato plants begin to sprout, fill in the space inside your fence with straw, additional soil and leaves. Be sure that you don’t bury your plants, the soil should only be brought up about two to three inches inside the cylinder.
When your potato shoots are about a foot tall, cover them up completely with straw, leaves or another similar type of material.
As your plants grow, continue to fill up your cylinder as they’ll use the extra soil to grow more potatoes. It won’t be long before the entire thing is filled with straw, leaves, soil and potatoes. Remember, they need lots of water – enough to soak them thoroughly, but not so much that it drowns them.
7. Potato Tire Tower
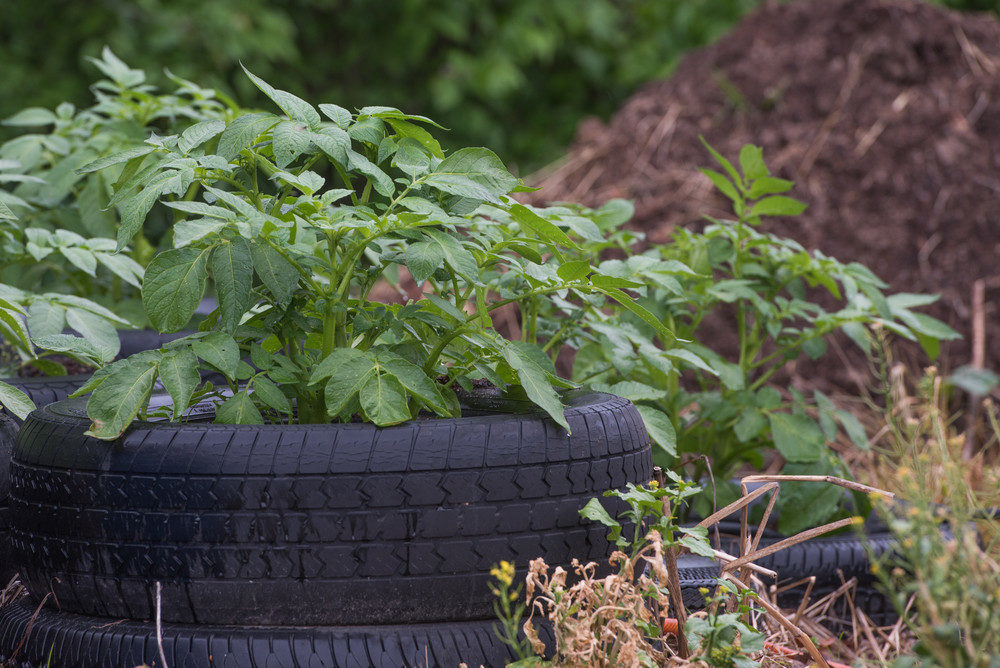
More and more people are using old tires for growing all sorts of things, including potatoes.
All you have to do is wash them thoroughly to remove any road grime first. It’s a great, eco-friendly way to re-purpose any tires you might have hanging around in the garage or your yard.
If you have room for a car tire placed flat on the ground, you can grow four to five potato plants that produce lots of potatoes.
All you need is soil, seed potatoes, and tires.
The Method
Lay a tire down in an area that gets at least seven hours of sunlight every day. Fill up the interior with garden soil to the upper rim.
Cut two seed potatoes into thirds, ensuring that each piece has a few eyes on it. Plant those pieces around the edge of the tire’s interior, making sure they’re spaced out equally with the eyes facing up.
Place another tire on top of that, and as your potato plants grow, add soil to that tire’s interior. Keep your plants covered with soil, with only the top four or five leaves peeking out.
When your potato plants reach the top of the second tire, it’s time to add another tire. Continue to add soil to cover all but the top four or five leaves of the plants.
If desired, you can add a fourth tire and continue as before.
As with the other methods, your potatoes can be harvested when the leaves begin to yellow and the foliage dies off. You’ll have to carefully remove the top tires first, removing the soil from around the potatoes, and continuing the process tire by tire until you’re done.